How to Add and Remove Termination Blocks (CONX)
Fundamentals
Termination blocks (or CONX blocks) are used by Elecdes to contain ferrule and crimp details for the terminations in your electrical drawings. They are added and deleted automatically through either the Global Edit function or from on the utility menu.
The termination blocks hold part number (catalog) information for the crimps or lug connectors for the termination. If this data is present it will come out in the material reports from Ebase.
The termination blocks hold part number (catalog) information for glands for a cable when placed on a single line cable diagram.
The termination blocks also contain attributes to contain a label (ferrule label) for the termination. If this is present it will come out in the connection reports from Ebase.
The termination blocks contain a WORDER attribute which can be used to control the wire termination order for the Ebase reports and the wiring diagrams.
The termination blocks contain insulation information for the terminations of a cable when placed on a single line cable diagram.
You can add and delete termination blocks without using Global Editor to the current drawing using Elecdes.
Procedure
Click on
 from the menu.
OR use Global Update of Attributes and check Auto-insert Termination Blocks before pressing OK button.
Elecdes will scan the project drawings and calculate the number of termination (CONX) blocks needed to be Added or Deleted. You will be presented with the appropriate options checked as shown below
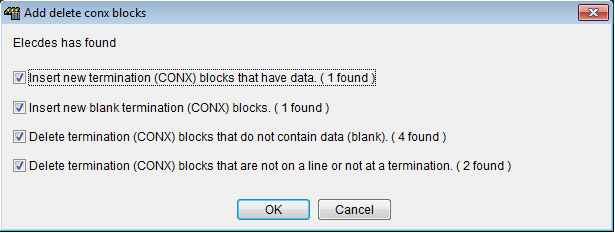
You can add new Termination blocks (CONX) which were modified using the Global Update of Attributes function.
You can add new BLANK Termination blocks (CONX) which are missing from the drawing.
You can delete the BLANK Termination blocks (CONX) in project drawings.
You can delete the Termination blocks (CONX) which are are not on a line.
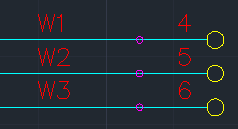
The CONX blocks appear as small purple lines near the connection points of the conductors. These are all inserted on the FERRULE layer and can be hidden by making that layer invisible.
The WORDER attribute of the CONX block is located on the WORDER layer. This layer is frozen by default and you can display or make invisible the WORDER values of the CONX blocks by turning that layer on or off. This is how the Termination (CONX) blocks look when WORDER layer is not frozen.
Pick Wire Order
A function to set the contents of the wire order blocks by PICKING each termination's ORDER has been added. The PICKWORDER function can be run from the command line or from the menu. This allows you to pick a wire marker of interest and then select the terminations in the order you require the wire segments to loop.
Prior to PICKING WIRE ORDER you need to ensure that the diagram has had termination blocks added as described in "How to add and remove termination blocks". Wire markers are also necessary for this function to operate.
See also
Termination Blocks (Elecdes)
How to add GLANDS and INSULATION information to the cables in single line diagrams (Elecdes)
How to add crimps to the ends of conductors (Ebase)