A Guide to Creating Terminal Strip Diagrams
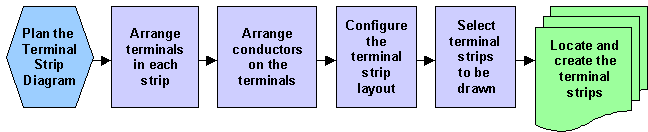
Plan the Terminal Strip Diagram
-
Ensure that you have included all of the required schematic and loop drawings into an Ebase project.
-
Ensure that there are no connection errors in the conductor schedules produced by Ebase.
-
Prepare a drawing for creating terminal strip diagrams. For a new drawing, insert a suitable border and zoom the drawing so that you will be able to place the terminal strips in the correct location.
Having the drawing in model space instead of paper space allows the wiring diagram system to draw faster.
-
If you are creating terminal strip diagrams on a drawing that contains other circuits, ensure that you will have sufficient space to place the strips.
-
If you wish to update an existing terminal strip diagram, you should have that drawing open in the current drawing session.
Arrange the terminals in each strip
-
Switch to the T-Strip Edit dialog.
-
Select the terminal strip that you want to edit.
-
You may find the terminals extracted from the schematic or loop drawings are not in the order that you require for your terminal strip. Re-arrange the terminals of the selected terminal strip if required.
-
You can split a terminal strip and draw it as separate terminal strip diagrams. The strip will become two separate "sub-tstrip" entries in the device list on the Main dialog. Similarly, you can re-join a split terminal strip.
-
Spare terminals can be added to the terminal strip if required.
Arrange the conductors on the terminals
-
You may find that the conductors have been assigned to the incorrect side of a terminal strip. Move the conductors on the current terminal strip from one side to the other as required.
-
You may find that you need to change some links between bar links (bridge bars), wire links or shown as standard wires. Change the type of the links as required.
Configure the terminal strip layout
-
Return to the Main dialog.
-
You can choose to orient the wires horizontally or vertically:
-
If you choose horizontal wires, the terminal strip will be drawn down the page and the wires will extend horizontally on the left and right sides.
-
If you choose vertical wires, the terminal strip will be drawn from left to right across the page and the wires will extend vertically from the top and bottom.
Each terminal strip can have a different wire orientation.
-
Select the terminal strips to be drawn
-
Select only the terminal strips that you want to draw. Include any strips for which you are creating new terminal strip diagrams and any strips for which you are updating the terminal strip diagram.
Terminal strips can be de-selected if they have existing diagrams that are already correct. Terminal strips that have existing diagrams will have been selected automatically when you started the Wiring Diagram Generator.
Locate and create the terminal strips
-
Click the Create Wiring Diagram button.
-
Any existing terminal strip diagrams that have been selected will be updated.
-
When you create new wiring diagrams, the Wiring Diagram Generator will estimate the overall size of the new wiring diagrams and create a box that you can drag in the Elecdes drawing window. Pick the location where you want to place the wiring diagrams.
-
The terminal strip diagrams for the selected strips will be drawn at the chosen location.
Repeat the procedure to add further terminal strips
You can repeat the procedure as necessary to add further diagrams to the same drawing. When you run the Wiring Diagram Generator again, all existing terminal strip diagrams on the current drawing will be pre-selected in the device list.
Refresh existing terminal strip diagrams
Use "WDE" to refresh existing terminal strips with updated schematic information.
Audit existing terminal strip diagrams
Use "WDA" to audit existing terminal strips.
Use "WDAC" to clear the terminal strip audit.