A simple Protogen Exercise
First Steps
Protogen is provided with sample prototype drawings for you to explore without needing to create your own prototype drawings. This topic will show you how to use Protogen to create clone drawings from one of the sample prototypes.
Protogen requires one or more prototype drawings and databases. The database must contain the text to replace each formula found on the prototype drawing when making a clone drawing.
Step 1: Create a Protogen database
Protogen can create a blank database with a field structure to suit one or more prototype drawings. The selected prototype drawing or drawings are scanned and a field will be created for each unique formula.
This method of creating a database is one of several. It is the fastest method of creating a simple database file from templates which are already in existence. The normally recommended method is to use Protoedit to develop your database files.
-
Start Protogen.
-
Select the Protogen pull down menu.
-
Select Create New DBF from Template/Prototype DWG.
-
Enter a NEW Protogen database file name in the FILE dialog box (e.g. FRED.DBF). Press OK / Save.
You will then be displayed the Choose Prototype Drawings to be used with new DBF dialog box.
This allows you to select one or more prototypes for which to create a common database.
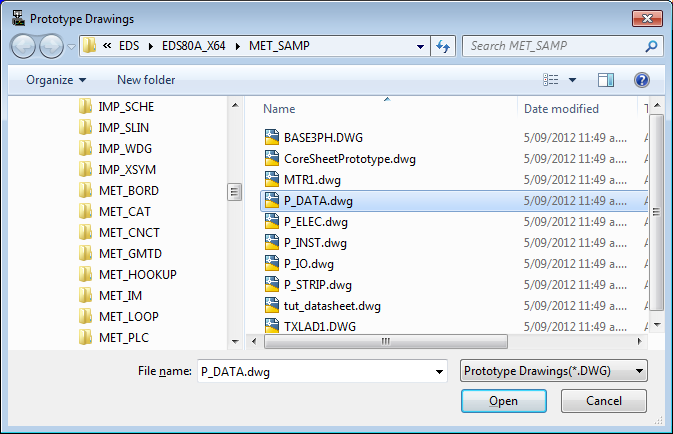
-
Select P_DATA.DWG [sample prototype] from the directory <EDS>\IMP_SAMP [or <EDS>\MET_SAMP for metric users].
The FRED database will be created in your working directory AND be displayed in your workspace.
The database is created with one BLANK RECORD.
The database will contain one field for each unique formula found in the selected prototype drawing.
The first two fields are special for Protogen.
The drawing field is reserved for the file name of the clone drawing to create from a record.
The prototype field is reserved for the file name of the prototype drawing to use as a template for a record.
Each record in the Protogen database can be used to create one clone drawing.
Now that you have a prototype drawing selected and a database to use with it, you can fill in the clone drawing names and data. In our example we will create 5 clones of the PDATA.DWG prototype with the FRED database.
Step 2: Place 5 records and data in a Protogen database
Protogen creates the database with one blank record. You should add 4 more blank records. The status bar at the base of the workspace informs you of how many records are in the database.
-
Click on any records in the first row and press <enter> 4 times.
Your database should now contain 5 records.
You must provide a UNIQUE file name for each of the clone drawings you wish to create.
-
Enter a unique name in the drawing field for each of the five records, e.g. "FRED_1" to "FRED_5".
Do NOT include the file name extension ".dwg".
-
The prototype field specifies which prototype drawing should be used as a template for each clone drawing [each record].
Protogen can provide you a list from which you can pick the prototype drawing. Click the mouse in to the first record then click the RIGHT mouse button. Select Pick Prototype it will display list of Prototype Drawings.
-
Pick the P_DATA prototype drawing, then click Open.
-
To fill in the other 4 records: Click and drag, from the second record to the fifth, to highlight the lower 4 records.
-
Click the RIGHT mouse button. The Pick Prototype to display the list [again].
-
Again pick the P_DATA prototype drawing then click Open.
-
You should now enter some data to all of the remaining fields of the five records. The data you enter is unimportant for this exercise, although you should enter different data into each different field and record.
-
Press CTRL S to save your file.
Now that you have a prototype drawing selected and a database full of data, you can create 5 clone drawings.
Step 3: Create drawings FRED_1 ... FRED_5
-
You can create multiple clone drawings in one operation by highlighting multiple records.
Click the left button in any field of the first record and drag the mouse pointer down to the fifth record. A grey highlight should appear, covering at least one field of each of the five records.
-
Select the Protogen pull down menu.
-
Select Transfer between DWGs and selected Records.
-
Protogen can transfer changes both from the database to the clone drawings and vice versa.
Click Create/Update clone DWGs from database.
-
The 5 drawings named in the drawing field will be created in the EDS working directory.
-
Any data in the non-drawing fields will be transferred to the drawing field (in this case P_DATA in the prototype field)
Use the supplied EDS Plotter utility or your CAD package to open and view the drawings.
Important Notes:
A/ Clone drawings will be generated in the same revision of the drawing format as the prototype drawing.
e.g. If your prototype drawing is R14 then the clone drawings will also be R14.
B/ In general your CAD package will lock those files that are open in a drawing session with operating system locks. You cannot write Protogen UPDATE data to a clone drawing which is also open for editing with the CAD package.
Create Clone Drawings - In More Detail.
Summary
The simple procedure above outlines the main use of Protogen. To create clone drawings quickly there are many more options you can use for database and data creation.