How to Lock, Issue and Pull Cables
Paneldes provides a Route and Cable Locking Dialog interface for cable locking, issuing and pulling, as shown below:
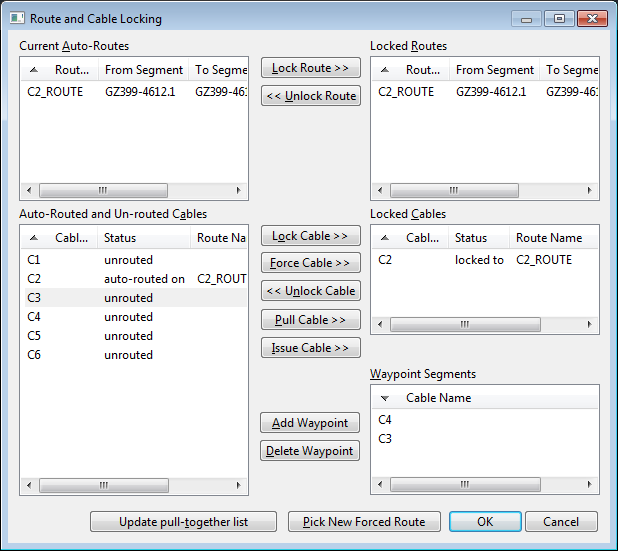
Cable locking:
You can lock a cable to any existing route, rather than auto routing the cable each time route optimisation is done. Locking to a route causes the old route to be re-used for the cable. The name and segments of the route will be persistent. The cable can be locked to either a locked or forced route.
Procedure to Lock and Unlock a cable
-
Select the Route and Cable Locking entry from the Routing: Wire and Cable menu.
If you have not modified you model, you can load cached data to reduce the time required to load the route segment connections and panel and device lists.
-
Select an auto-routed cable in the auto-routed and un-routed cables list on the left and press "Lock Cable" to lock it to its current AutoRoute for future routing. This can only be done for an auto-routed cable, not an un-routed cable.
The appropriate route will be locked automatically if it has not been locked already.
-
Select a locked cable in the Locked Cables list on the right and press "Unlock Cable" to remove it from the locked cables list. If this is an issued or pulled cable, then you will be asked to confirm that you want to unlock the cable.
The route to which this cable was locked will remain locked until you specifically unlock it.
-
Click OK to save the locked cable information.
Procedure to Force a cable to use a route
-
Select the Route and Cable Locking entry from the Routing: Wire and Cable menu.
If you have not modified you model, you can load cached data to reduce the time required to load the route segment connections and panel and device lists.
-
Select a locked route on the right and any cable on the left and press "Force Cable" to force the cable to use the selected route.
You can choose any route from the locked routes list, including routes that you have previously dictated.
-
Click OK to save the locked cable information.
Issued and Pulled cables
The Paneldes Route and Cable Locking system also allows the user to mark a routed cable as pulled or issued.
Once a cable has been marked as pulled, all of the conduits on its route become unavailable to the Paneldes route optimisation system. This feature allows the user to ensure that the routers do not instruct the installers to pull new cables in to the conduits that have already had cables physically pulled into them.
Similarly, cables marked as issued block other non-issued cables from using the same conduits. Issued cable and route reports provide a summary of the information in the complete cable and route reports. The issued cables pull-together list shows the cables sharing conduits with issued cables that must be pulled at the same time.
NOTE: You should not re-run the route optimisation while you are in the process of marking cables as issued. When you re-run the route optimisation, conduits used by issued cables will become blocked to other cables. Only perform further routing when you have finished marking the cables that are being issued.
Procedure to mark a cable as Pulled:
-
Select the Route and Cable Locking entry from the Routing: Wire and Cable menu.
If you have not modified you model, you can load cached data to reduce the time required to load the route segment connections and panel and device lists.
-
Select the cable to be pulled from either of the auto-routed or locked cables lists.
-
Press the Pull Cable button. This will lock, and mark as "pulled", both the cable and its route.
Important: The route must exist AND be correct before you mark a cable as "pulled" through that route. If you do not have an existing, correct, route you may need to FORCE the cable through a "New Forced Route" that matches the route provided by the cable installers.
Procedure to mark a cable as Issued:
-
Select the Route and Cable Locking entry from the Routing: Wire and Cable menu.
If you have not modified you model, you can load cached data to reduce the time required to load the route segment connections and panel and device lists.
-
Select the cable to be pulled from either of the auto-routed or locked cables lists.
-
Press the Issue Cable button. This will lock, and mark as "issued", both the cable and its route.
Important: The route must exist AND be correct before you mark a cable as "issued" through that route. If you do not have an existing, correct, route you may need to FORCE the cable through a "New Forced Route" that matches the route provided by the cable installers.
See also
How to force, lock or unlock a route
How to check which cables must be pulled together
How to set waypoints for a cable