How to Show Paneldes Data in Navisworks
General
You can show Paneldes component attributes and cable routing information from a Navisworks view of your model.
Paneldes file types for Navisworks
The primary file to load into Navisworks is your model, which may include multiple xref drawings. The other files listed below enable Navisworks to show Paneldes model data and/or cable routing data.
NavisworksLink.xlsx
Navisworks 2020 and older cannot show attribute values, so instead you must generate the NavisworksLink file from Paneldes, then link to that file from Navisworks. The NavisworksLink file contains the Paneldes data to show for each component, and is linked to the drawing entities by each entity handle.
Navisworks 2021 and later can show the block attribute values, which will show the Paneldes data. The NavisworksLink file is not required for Navisworks 2021 and later.
The NavisworksLink report is generated in your current project directory and consists of data combined from the Paneldes Bill of Materials report and the Cable Cross-Section report.
Annotations.dwg
This drawing contains block entities with attributes containing Paneldes cable routing data.
Load this drawing an xref into Navisworks along with the model.
CableView-NNNN.dwg
The cable drawings are a numbered set (NNNN is a simple sequence of numbers, or the value from NAVIS_DWG) that contain drawings of all of the cables that currently are routed. Each cable is a block entity with attributes containing Paneldes cable and routing data.
The cables are divided between multiple drawings to ensure that no one single drawing is too large to load and view.
This function will draw all of the cables that are currently routed and always into new external drawings. The drawing of each cable is the same as is created when you draw one or more selected cables from Route and View Cables.
If the routing cable report, RCabsch, for the project contains a column NAVIS_DWG then, instead of an automatically assigned number, the value in NAVIS_DWG replaces NNNN in the cable drawing file name. If multiple cables have the same value in NAVIS_DWG then all of those cables will appear on the same cable drawing.
Load one or more of these drawings as xrefs into Navisworks along with the model.
Navisworks file formats
Navisworks has three native file formats NWD, NWF, and NWC as explained below.
NWD File Format
NWD or the Navisworks Document file is an overall compiled snapshot of your CAD model with all the scenes, comments, geometry, external data (e.g. Paneldes Data) embedded into a single file. NWD file can be published through Navisworks Manage only. These files are considerably smaller than the CAD format therefore quicker to load and easier to share. NWD files can be viewed in any Navisworks product including Navisworks Freedom.
NWF Files
NWF or the Navisworks File Set file contains links to all the CAD models, viewpoints, comments, graphical overrides, time liner etc. You will notice that the size of the NWF file is too small as compared to NWD or NWC files. NWF is used as the standard file format when working with ongoing projects because any updates made to the CAD drawings can be captured in and NWF file. The NWF file cannot be opened by Navisworks Freedom.
NWC Files
NWC or the Navisworks Cache file contains all the CAD to Navisworks conversion data. Every time you open a CAD drawing (e.g. your Paneldes Model) in Navisworks Manage, it creates a cached version of the CAD drawing with the extension ".nwc". If your CAD drawing is modified since the last time the NWC was created, then the NWC file is re-created. However, if there is no change in the CAD drawing then the existing NWC file is loaded.
Procedure to generate files for viewing in Navisworks
Ensure that Navisworks is closed. Paneldes cannot update the NavisworksLink report while it is held open and locked by Navisworks.
Select function from the Utilities and BOM menu.
The Generate Navisworks Input Files dialog box will appear.

Choose the desired Navisworks input files that you want to generate and click on the [OK] button.
The selected files will be generated and saved in your current project directory in the folder named "Navisworks".
Required Navisworks Manage options
If your Paneldes model contains XRefs then, when you select an object in Navisworks, you may not see the Paneldes component data in the properties window. This happens when Navisworks does not set the selection in the Selection Tree to the appropriate drawing entity, and this will most likely happen if your drawing was composed of multiple XRefs. Paneldes models contain entity groups, which causes the same problem for selection.
- Start Navisworks Manage.
- Open Navisworks > Options.
In the Options Editor, go to File Readers > DWG/DXF.
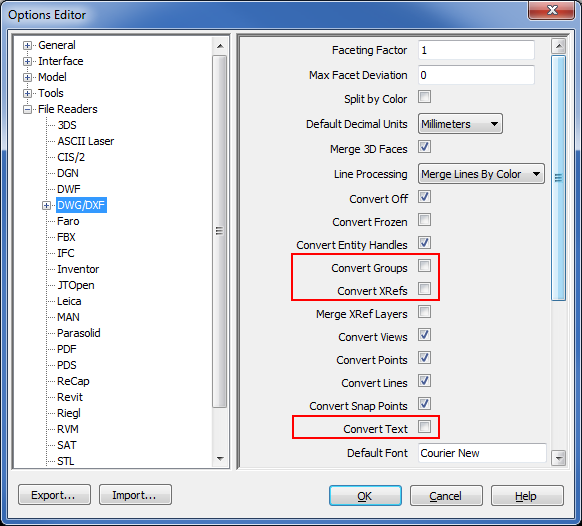
Uncheck Convert Groups and the Convert XRef options.
NOTE: To properly query Paneldes data in models comprised of xref drawings you should attach each xref individually, rather than converting the xrefs that are loaded in the main model. This method, along with choosing to select (in the next step), provides the best ease of use.
If you are using Navisworks 2021 or later then you should leave Convert Text checked. This will show all visible attribute values (such as component tagnames) and text entities in the model.
If you are using Navisworks 2020 or earlier then you cannot show attribute values and you must ensure that Convert Text is unchecked, otherwise Navisworks 2020 will show the attribute tags (the names of the attributes), which are of no use when viewing the model.
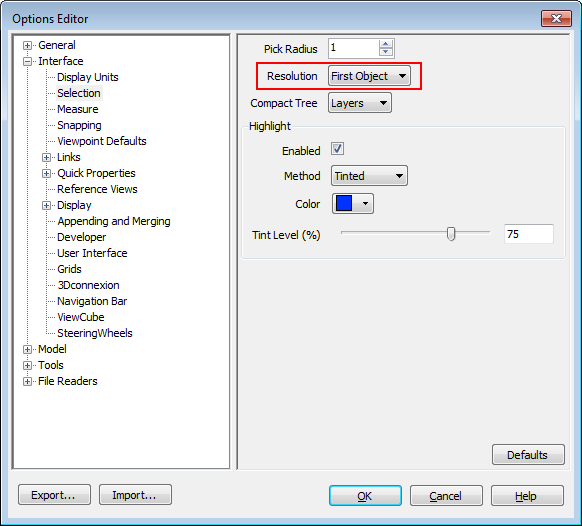
In the Options Editor, go to Interface > Selection and choose from the list of options for Resolution, as shown below:
- Press to close the options dialog.
- Open your DWG file or, if one is already loaded, click .
Procedure for linking to NavisworksLink.xlsx from Navisworks Manage
NOTE: This is only required to show Paneldes data in Navisworks 2020 and older. Later versions of Navisworks can directly show block attribute values, which will include the Paneldes data.
Once your NavisworksLink report is generated, you can use DataTools to link it to your drawing inside Navisworks Manage. The following procedure explains the steps to link the report your NWD file.
Open your Paneldes drawing file in Navisworks Manage using FILE > OPEN, then select the drawing file.
If your model contains XRefs, click on the Append icon from the Home tab on the ribbon:

then select the various drawing files that were XRefed to make up your entire Paneldes model.
Once the file is loaded in Navisworks, click on the DataTools icon from the Home tab on the ribbon.

You will be presented with the DataTools dialog as shown below. This dialog will show all the existing DataTools links available to your project.
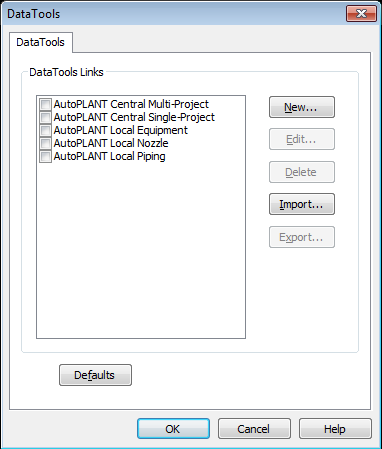
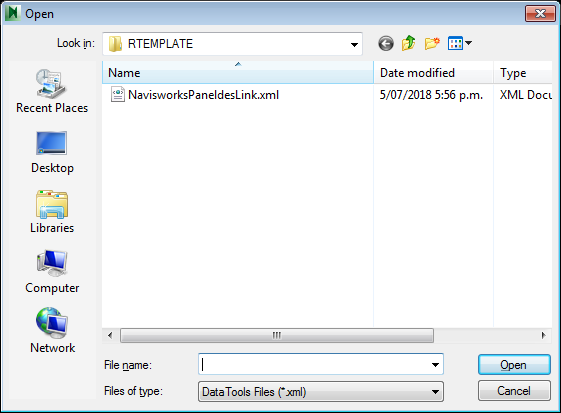
Press the button and browse to the NavisworksPaneldesLink.xml file from RTEMPLATE folder of your current EDS installation and press .
A new DataTools link named "Paneldes_link" should now be in the list.

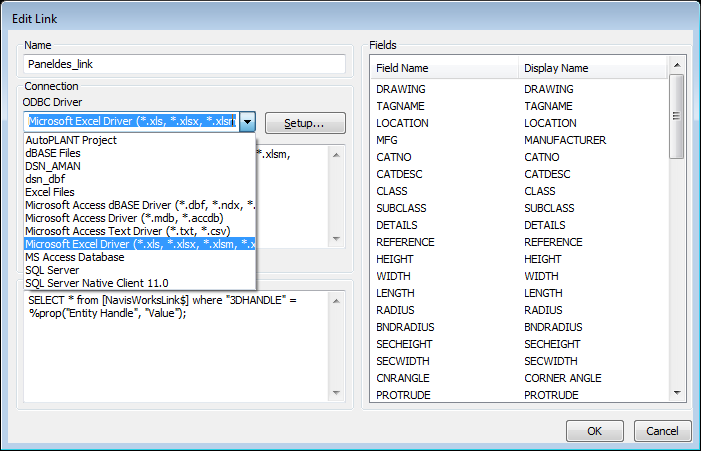
Select "Paneldes_link" from the list and press the button to open the Edit Link dialog.
Choose Microsoft Excel Driver(*.xls,*.xlsx,...) from the list of ODBC drivers as shown below.
Press the button to configure the ODBC driver for Excel. You will be presented with a dialog as shown below.
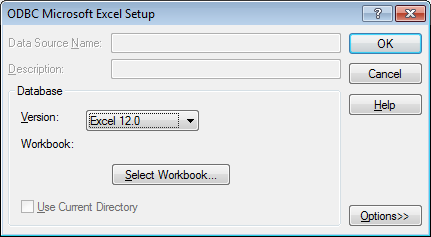
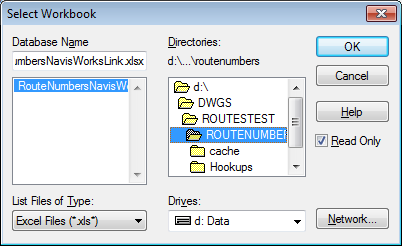
Press the button then browse to your current project directory and select your NavisworksLink report, as shown in the example below, then press .
In the ODBC Microsoft Excel Setup dialog you should see part of the name of the NavisworksLink report file beside the Workbook field, as shown in the example below.

Press to close the ODBC Microsoft Excel Setup dialog. The Edit Link dialog should now show a connection string in the box just below the ODBC driver combo box, similar to the left side of the figure shown below.
Tick the checkbox Hold open for application lifetime.
You can now add, change or delete the fields in the list to be used by Navisworks to fetch the data from the NavisworksLink report.
To add a field, scroll to the bottom of the existing list of fields, double click in the empty space in the Field Name column and enter the name of each field that you wish to show. The field name should match exactly to a column in the NavisworksLink.xlsx file. You can enter the fields in any order and you can set a display name that differs from the original column name.
You can change a field name or display name by double clicking on an existing entry in the Fields list.
To delete a field, right click on the in the Field Name column and select Delete Row.
NOTE: The Field Names entered into the Edit Link dialog must match the fields in the NavisworksLink.xlsx file exactly, including matching the case of the letters.

Press to close the Edit Link dialog.
Click on the box beside "Paneldes_link" so that it is ticked, as shown in the figure below.
Press to close the DataTools dialog.
Display the Properties window in Navisworks.
Select an object in the model.
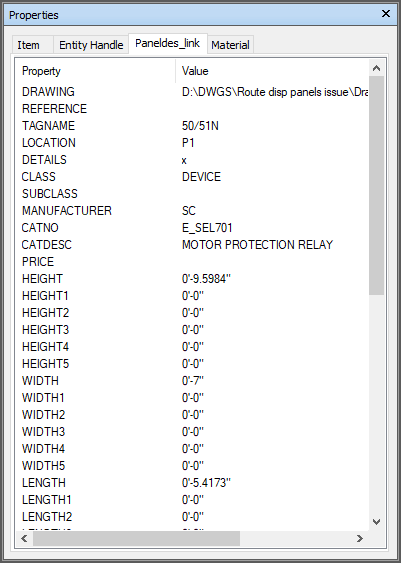
You should see your Paneldes data on a tab with the name that you entered into the link configuration (e.g. "Paneldes_link" in the figure below). Navisworks will fetch the data for your selected fields from the NavisworksLink report when you click on an entity in the drawing, as shown in the example below.

Procedure for creating a stand-alone NWD file for the free viewing tool, Navisworks Freedom
Once your Paneldes model is linked to the Paneldes data in Navisworks Manage, you can publish it so that it can be viewed by anyone using Navisworks Freedom. Publishing creates a NWD file embedded with Paneldes link data.
Follow the steps below to publish your model.
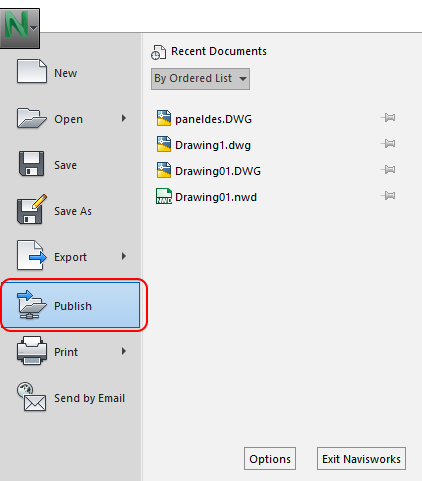
Click Navisworks > Publish, as highlighted in the figure below.
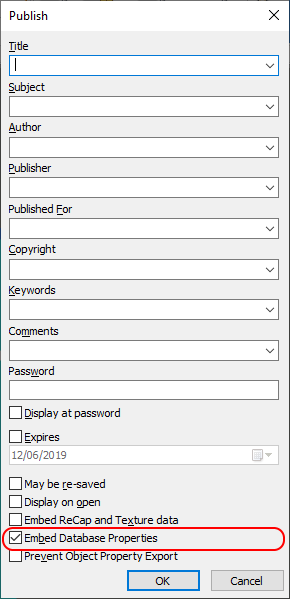
You will be presented with the publish dialog, as show below.
Tick the checkbox Embed database properties in order to see all the Paneldes link data in the published file.
Press and choose a suitable name for your published file.
Procedure for viewing Paneldes Data in Navisworks Freedom
Once your NWD file is published, follow the steps below to view your model with Paneldes link data in Navisworks Freedom.
Open Navisworks Freedom.
Click Navisworks > Options.
In the Options Editor, go to Interface > Selection and choose from the list of options for Resolution, as shown below:
Press to close the options dialog.
Open the NWD file.
The Paneldes data will be shown in a new tab in the Properties window when you select an entity.