How to Set Model Units and Scaling
General
All 3D models created in Paneldes represent real world objects. The real world objects have a physical size, which is both critical to their placement and their construction. Paneldes can build your model to any scale and use imperial or metric units when specifying the size and position.
Paneldes requires you to set the units and the model scale before construction can begin.
Paneldes must store your scaling settings in the drawing to avoid tiresome re-entry of this data whenever you wish to work on your model. Paneldes uses an AutoCAD block with attributes, inserted at the 0,0,0 origin, to store your settings.
Paneldes Datum Scaling Block
This block is called DATUMSC.DWG and may be found in the <EDS>\IMP_BORD or <EDS>MET_BORD (for metric users) directories. The attributes of DATUMSC are used to store your scaling information.
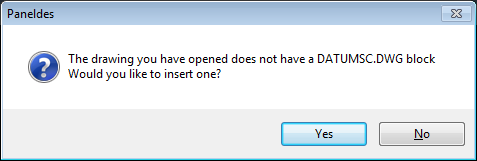
Whenever you start a NEW drawing you will be offered the opportunity to insert a DATUMSC block.
Warning
Editing the scaling, after construction of the model is under way, will alter the scaling used by Paneldes construction functions and cause erroneous results. Insert a DATUMSC block and set the scaling and units BEFORE construction of the model begins
Units
Paneldes can work in the units you specify, METRIC or IMPERIAL. Paneldes for users in the USA should have the base units set to in (inches). All other countries should have the base units set to m (metres). To alter the default base units used by Paneldes, you should close down the CAD package and run the EDS Setup program.
When EDS is configured for imperial drawing units, a Paneldes drawing will be configured to architectural units. Paneldes can accept architectural units for all measurements. Sizes can be input to Paneldes in INCHES (e.g. 24" ), FEET (e.g. 2' ) or a combination of both (e.g. 2'-4").
Procedure
Inserting the DATUMSC block
-
Select the INSERT DATUM/SCALE BLOCK entry from the Utilities and BOM menu.
-
If this Dialog does not appear then the block is already present on the drawing and you should use the next procedure Editing the DATUMSC block to modify the scaling and units.
-
Select Yes to insert a datum scaling block, DATUMSC.DWG, at 0, 0, 0.
-
You will then be presented with the SCALE EDITING dialog box. Fill the data in as you desire. The next procedure Editing the DATUMSC block describes the data required in this dialog box.
Editing the [units/scaling data of] the DATUMSC block
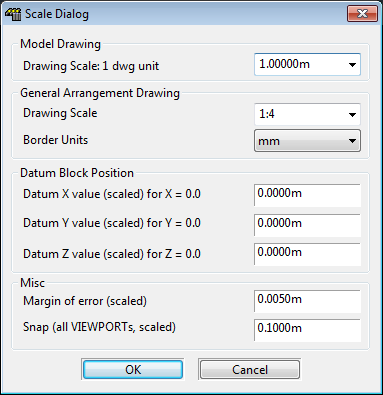
Select the Modify Drawing Scales entry from the Utilities and BOM menu. You will be presented with the following dialog box.
-
Fill in the DRAWING SCALE data. This will set the size of 1 AutoCAD drawing unit to be the size you specify for all future construction in this model (e.g. in the above dialog ... 1 drawing unit = 1 metre). The drop down contains some useful defaults.
-
Choose a general arrangement drawing scale and the units of the border you are going to use for the general arrangement drawing.
-
Fill in the DATUM X, Y, Z values. This is the point, in real world co-ordinates, that Paneldes will map to the 0,0,0 point on the model. Unless models will physically overlap once constructed, this can be set to 0.0, 0.0, 0.0.
-
The Margin of Error is a tolerance value that Paneldes uses to determine if two positions are the same.
-
This dialog also contains a convenient way of setting the AutoCAD SNAP size for all of the viewports in the layout you are currently working in. The snap setting is offered in SCALED UNITS. This function or the standard AutoCAD snap function can be used for this purpose.
-
Press OK when complete or Cancel to abort.
Note: To avoid confusion, always append the base units you have chosen to the values in this dialog.
e.g. 1.000m.... NOT 1.000
or 1.0".... NOT 1.0