How to Edit an Existing Ductbank
General
Ductbank editing uses the same general procedure as that used to create a new ductbank. This section will outline the differences to be found when editing an existing ductbank.
See also
How to shrink a trench to fit a ductbank
Procedure
-
Select Construct Ductbank from the Construction menu.
-
You must select the segment or trench in which you wish to edit the conduit cross section.
You should pick with the CAD cursor on the route line of the trench segment. The object snap mode will be set to nearest to assist you. Paneldes will automatically ignore items in your model that are not trench segment route lines.
-
You must select the end of the trench segment that you want to "look into". The end you select to "look into" will match the alignment of the conduit drawing area. The object snap mode will be set to endpoint to assist you.
-
The ductbank editor dialog will be displayed. See Ductbanks for more information about the ductbank editor.
-
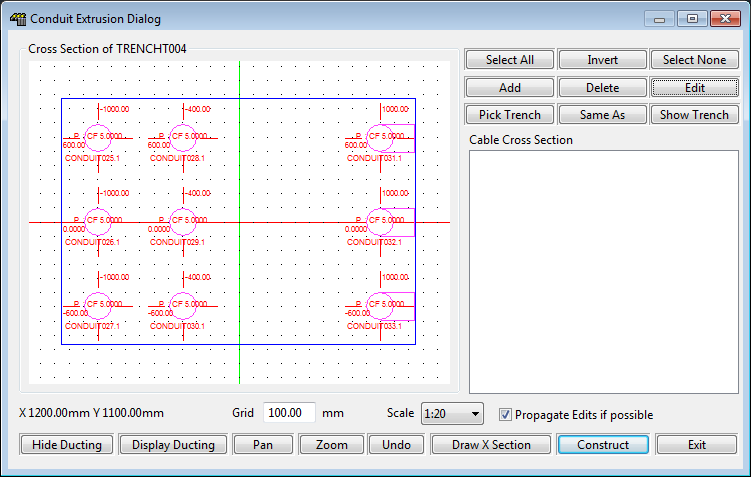
The green conduits show those that have already been placed in the ductbank.
Pink conduits are suggested continuations from conduits in a connected trench segment.
You can edit the properties of these conduits and any other conduit in the ductbank.
Many of the editing operations you can perform MAY be propagated to the end of the ductbank you are editing, changing many conduits in a single operation. To achieve this you must ensure that you have the "Propagate changes" checkbox checked. The following operations will propagate where possible if enabled: Move, Size and spec. change and Delete.
-
To edit the conduit specs or naming: Select one or more conduits and click Edit to modify the properties of existing conduits in the Conduit Properties dialog.
-
To move the conduits: Click on single conduits and then drag them within the cross section to arrange them as required. It is possible to move the (green) conduits that have already been placed in the ductbank. Conduits will snap to the current grid.
-
Click Add to add new conduits to the ductbank.
-
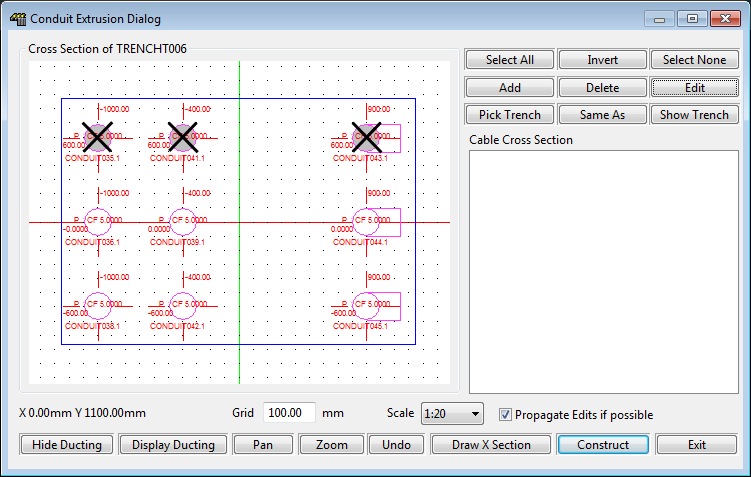
Click Delete to remove conduits from the ductbank. This will mark an existing conduit with a black X.
The top row of conduits in the example are marked for deletion.
-
If you specifically want to prevent an existing conduit from being re-constructed, press the [Shift] key on your keyboard, then click Delete. This will mark the conduit with a red X to show that it will be ignored. This conduit will not be re-constructed.
This may be necessary if you have manually placed a conduit with Paneldes that is detected and incorrectly redrawn when editing the ductbank.
Two of the conduits in the bottom row in the example are marked to be ignored.
-
-
When the conduits have been arranged to your satisfaction, click Construct.
-
Existing conduits in the selected trench will be re-constructed. Paneldes will retain the original entity properties assigned to the original conduits, such as colour, linetype and layer.
Existing conduits marked to be deleted will be removed from the model.
Existing conduits marked to be ignored will remain completely unchanged.
Any new conduits will be constructed.
Corner angle too tight
If Paneldes finds a bend angle and radius which is too "tight" to fit in a ductbank's trench corner, it will not construct the bend with a curved conduit. It will approximate this bend with a straight section of conduit. This has negligible effect on any other operations including routing. This will occur during initial placement and also if a conduit is moved laterally in the editor, across the face of a trench toward the centre line of a trench bend.
Continuation
-
If the far end of the selected trench is connected to another segment of trench, then the ductbank editor dialog will be re-displayed. The connected trench will be automatically selected, looking into the connected end.
-
Paneldes will insert "suggested" new conduits in to the conduit cross section window. This allows you to automatically continue the cross section from the previous trench.
-
Existing conduits will again be coloured green.
-
If you do not wish to edit this trench segment you can click Pick Trench to choose another trench to edit, or you can click Cancel to exit the ductbank editor.
-
If the trench segment does not have an obvious connection to another segment, then you will be asked to pick the next trench segment and the "look into" end of that segment – just as you did at the beginning.