How to Query Components on your Drawing
General
Paneldes allows you to QUERY any component in the drawing by PICKING it with the mouse or typing its TAGNAME. If you PICK a component Paneldes takes the HANDLE of the component you have chosen and searches the B.O.M. file for a record with a matching HANDLE. If you type a tagname Paneldes will search the B.O.M. file for a record with a tagname that matches. Once the record is found it will be displayed in the Query Dialog.
Component selection for other functions
The Query system is used for all component selection requirements in Paneldes. Any time that you are selecting components for a Paneldes function, you are provided with their full details via this function. You can therefore select and highlight components that are part of XREFS, which is beyond the standard AutoCAD entity selection methods.
Uses
Using this function you can at any time:
-
Establish the tagname, type and size of a chosen component on your model.
-
Locate a component in a complex model.
-
Determine the power setting and cable factor of a segment of raceway.
-
Establish the price of a component and its supplier.
-
Establish the area classification for a component.(ZONECLASS)
Notes
-
Query will update your Bill of Materials before proceeding if it is not up to date.
-
Query displays all of the fields of the BOM for the chosen component. These fields are described in Bill of Materials.
Component Query Procedure
To query a component on the drawing, execute the following procedure.
-
To directly run the Query function, select the Query a Component in Model/BOM entry from the Utilities and BOM menu.
If you are using a Paneldes function that is requesting that you select components, then that function initiates the following query procedure.
-
You will be displayed a dialog box asking if you wish to regenerate your BOM file. If your BOM is not up to date click the YES button, or else click the NO button. If you choose yes, the Bill of materials file will be updated and a small delay will occur.
-
Once the BOM file generation has been completed, you will be presented with the Query Dialog:

-
If you wish to find all components that match a wildcard pattern, or you know the exact tagname and location of the component, then click the Find Button.
Filters must use Specmatch syntax.
This will display the Find Components form window. Enter the attribute values that you want to search for and click OK. You can choose the naming and class values from lists of "used components" attached to those fields.
If you want to add the results of this search to the components already listed in the query window, then remove the tick from the Clear current list checkbox.
For example, if you wanted to find all components on the drawing that have a location of P1 and a tagname starting with the letter M you would enter M* into the tagname field and P1 into the location field and click OK.
If you press OK on the query window, all the selected components in the list will automatically be selected. This will allow you to manipulate (for example, Move/Copy/Delete) the filtered components in CAD with ease.
-
You can pick the components with the mouse. The query dialog allows you to use your cursor to choose components in the drawing window.
-
You can also use the AutoCAD entity selection methods: Crossing and Window. To enable or disable these methods, click the buttons on the query dialog or enter a "c" or "w" on the AutoCAD command line.
-
Click the button Select All to select every component on the model.
-
You can add and remove items from the queried component list. The default is Add Mode where items you select or find will be added to the queried component list. To remove selected items, click Remove Mode, then use the find function or click on those items you want to remove from the list.
-
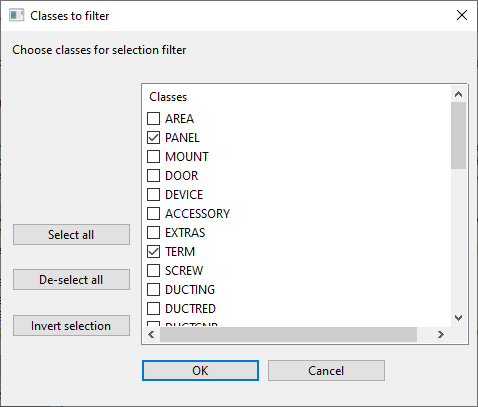
You can set a component class filter that is applied when you are adding or removing components from the list. Press the button Filter, and choose the classes (as shown below). When a filter is active and you click in the drawing to select components, Paneldes will add/remove only those components that match the selected classes. Filtering makes it easier to pick specific types of component from a busy area of a model.
-
You can directly select components in the top list box, and then click the Remove button to remove components from the list.
-
You can navigate to the circuit or to the project database by selecting a component in the top list and pressing the button. The Cross Reference Query Dialog will appear with a list of all the references of the component from the Project.
-
The Query dialog uses two lists to display the data. The top list displays the queried components. It shows the TAGNAME, LOCATION and CLASS of each component. The bottom list displays all of the data for the components that you have selected in the top list. If the data differs between multiple selected components, then *MIX* is displayed for that attribute.
-
When you change the selected component in the top list, Paneldes will draw a dashed white box on the drawing enclosing the newly selected component.
A magenta coloured "cross hair", a cross and square, will be drawn over the components that are currently selected in the top list. This cross hair highlights the selected components in a crowded model, even when zoomed out, because the size of the cross hair remains constant when zooming the view.
The cross hair size and colour can be changed. See How to Configure the General Settings.
-
Every time that you select one or more components on the drawing, even if they are already listed, they will become the components currently highlighted in the top list.
-
Click the button All to select all of the components in the top list.
-
Click the button None to de-select all of the components in the top list.
-
Click the button Inv to invert your selection in the top list.
-
-
When you have finished compiling your selection of components click OK.
If you are using a function other than Query, that is requesting that you select components, then every component that is in the top list will now be passed to that function, regardless of whether it was highlighted in the top list.