How to Perform Operations on Components in the Database
Component Specific Pop-up Menus
Each component in the category tree has its own pop-up menu. The functions available on this menu vary depending on the component type and the linking of the component.
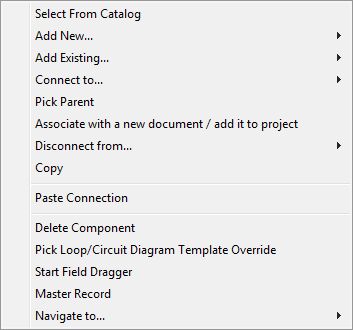
Above is a typical pop-up menu that can be displayed by right clicking on a component in the category tree. Some functions may not be available for all types of components, generally the pop-up menu will consist of a subset of those shown here.
Note that components displaying an "E" overlay on their icons are present on an actual drawing file of the current Ebase project. These components may only allow the use of a limited subset of the commands described below depending on the type of component.
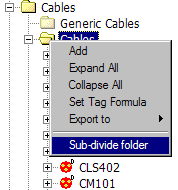
Subdivide/Split folders
CS allows you to manage large lists of components by subdividing the lists into several folders. When you select a component type folder (i.e. a folder containing wires/cables/raceway segments etc) you can use the right button menu to subdivide that folder. Your lists can be split into lists of a more manageable size.
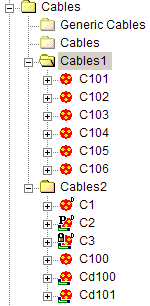
Subdividing the folder creates a container which can contain the identical type of component as the original folder. You can subdivide a cables folder to create more cables however you cannot subdivide a cables folder to contain enclosures.
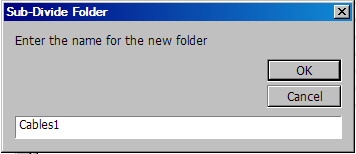
During the subdivision you have the option of setting the folder name.
Moving components between Split folders
When folders have been split or subdivided you can move a component or a group of components from one folder to another. This is done with drag and drop operations.
Select From Catalog
Reselect the specification for a component from the EDS catalog files.
Reselecting the Specification for a Component
Add New
Create new components contained within the currently selected component. For example, creating a new terminal strip within the currently selected enclosure.
Adding New Components to a Container Component
Add Existing
Choose one or more existing components to be contained within the currently selected component. For example, placing two terminal strips into the currently selected enclosure.
Adding Existing Components to a Container Component
Connect To
Choose one or more cables to be connected to this component.
Disconnect from...
Remove electrical connections between this component, cable or wire and any other items.
Multiple disconnection options may be shown based on the type of component, and the number of different connections it has.
Copy
Store the currently selected component in a buffer in memory. When a paste operation occurs, the component last copied in this way will be used as the component to be pasted.
Pressing Ctrl-C will also perform this operation.
You can also use the key stroke [Control-C] on a component and then [Control-V] on that same component to force IM/CS to make a new copy of that component in the same folder as the original.
The copy functions automatically bulk copy if you require, see bulk copy below.
Paste Link
Make the currently selected component the container of the last copied component.
This menu item will only be available if the currently selected component can be a container of the last copied component.
Pressing Ctrl-V will also perform this operation.
Paste Connection
Make the currently selected component connected to the last copied component.
This menu item will only be available if the currently selected component can be connected to the last copied component.
Pressing Ctrl-V will also perform this operation.
Paste Copy
Create a new component, duplicated from the last copied component, contained within the currently selected component or component folder. The number following the menu entry indicates the number of components that have been copied into memory waiting to be pasted.
This menu item will only be available if the currently selected component can be a container of the last copied component.
You will need to specify the name for any copied components. If the copied components contain other components, then Cable Scheduler will offer to copy these also.
You can also use the key stroke [Control-C] on a component and then [Control-V] on that same component to force CS to make a new copy of that component in the same folder as the original.
The copy functions automatically bulk copy if you require, see bulk copy below.
See Also: Adding New Components to a Container Component
Automatic "Bulk" Copy during copy operations
When doing copy and paste operations on an object, CS will now attempt to intuitively copy all items contained in that object and also copy all conductors connected to that object or the items it contains.
The contained items are referred to as "child objects".
The connectivity of the copied conductors is maintained.
You will be asked if you wish to copy "conductors" and "children" if IM/CS detects that there is a possibility of this being done.
The power of this function is obvious, you can make a Panel and its connections then copy that Panel several times, recreating all components, conductors, terminations, loops and other diagrams and avoid significant amounts of work creating individual components.
Incrementing Names of Child Components
By default, when copies of child items are made, their name stays the same. For example, if you make a copy of AREA01 > E1, you will get for example, AREA02 > E1, and the database will contain two "E1" records, each with a different parent.
If you would instead like the child components to be renamed during a bulk copy, you can use the following fields on the Paste dialog:
-
Child name substring: The value to match in the name of each child component.
For example, you may have Flow Transmitters FT101, FT102, FT103. If you want to increment the first digit, you could set this to 1.
-
First replacement for substring: The first value to use as a replacement in the copied child component names.
Using the above example, if you set this to 3, you would get FT301, FT302, FT303 (note that only the first match of 'Child name substring' gets replaced, so FT101 becomes FT301, rather than FT303).
-
Increment for substring: How much to increment the value by, for each copy of the child component.
Using the above example, if you set this to 2, the second set of copies would be FT501, FT502, FT503.
Note: these fields are only available when pasting an Area.
Delete Link
Remove the currently selected component from its container. The component is not deleted from the database, only the containment relationship. The container component remains unchanged.
This menu item will only be available if the item selected in the tree is a link to a component, which represents that the component is contained by the item at the next level up in the tree. Links can be identified by the small 'L' displayed on the icon of the component.
Delete Component
Permanently delete the selected component from the project database. If the component contains other components, then Cable Scheduler will offer to delete these also.
Pressing the Del key will also perform this operation.
Pick Container
Choose a container component in which to place the currently selected component. For example, choose an enclosure to contain a terminal strip.
Associate ... with ...
Choose one or more components to be associated with the currently selected component. Associations are always a many-to-one, i.e. multiple components can be associated with a single component. You can choose to make associations in two directions: associate this component with another, or associate other components with this component.
Navigate To
The navigation functions in the submenu of "Navigate To " allow an easy way of moving between link objects in the tree and their actual (master) objects. The master objects exist in the folder on the tree that represents the table in which the record for the component exists in the project database. Objects that are links are shown in the tree will an 'L' in the corner of their icon.
The number of navigate functions that will be available in the submenu depends on the types of links that can exist for the component.
-
Navigate To Parent Record. Set the current selection in the tree to the container of the currently selected component.
-
Navigate To Master Record. Set the current selection in the tree to the master object for the currently selected link object in the tree.
-
Navigate to Drawing Representation. If the component is present on any of the drawings in the project, you can select this option to navigate to the component in the drawing. The Cross Reference Query Dialog will appear with a list of all the references of the component from all the drawings in the Project. Select a reference from the list that you want to navigate to and press the button. For more information, see Cross Reference Query Dialog.
Show All Descendants
Sometimes it is useful to be able to see at a glance all of components that are inside a particular area, whether they are immediately parented by the area (eg AREA001 > PT001), or have intermediary parents (eg AREA001 > PANEL01 > X1).
This option switches between showing only the immediate descendants of an area, or all of the descendants. Descendants are shown in the lower pane.
To access this option, select an area in the tree, then right click on the area in the top pane.
See Also: Linking Components