Installation Procedure
General
Installation of EDS is a two step process.
The first step is to run the INSTALL.EXE program from the DVD, or run the installer downloaded from the internet. This creates all of the directories for EDS and copies the EDS files onto your local workstation. The second step, which automatically follows the execution of Install.exe, is Setup. Setup creates or updates the shortcuts / icons for EDS and also does some essential EDS configuration.
SETUP.EXE can be run at any time after installation to alter the configuration of EDS.
Server Installations: Sharing EDS Programs, Libraries and Parts List Catalogs
When installing EDS you can install directly to a server and have no Programs or Data files stored on your local PC. If you intend to share a network installation of EDS, during all installations after the initial server installation, simply enter the existing location of your initial server installation to the INSTALL directory. You will be offered the option of a Network Installation. See the section Existing Installations below. If you choose Network Installation, Install.exe will connect you to this installation. All programs, catalogs and symbol libraries will be shared. Some degradation in performance will occur when files are shared on a network.
Silent or Unattended Installation
The EDS installer can be configured to install silently (no user interaction required).
Stand-alone EDS
If you wish to install the GStarCAD OEM CAD engine (i.e. you do not currently have an existing CAD package on your PC) select the option to install GCAD OEM. The GCAD installer will execute before EDS is installed and, when complete, you will be returned to the EDS Installer.
Installation Procedure
Start the installer with one of the following methods:
Insert your DVD into DVD drive. The EDS Installer should run automatically (you may have to select it in the Autoplay dialog).
If the installation does not start automatically, open Windows Explorer, navigate to your DVD drive, then run install.exe
Or, run the self extracting installer that was downloaded from the internet. After the self extracting process is complete, the EDS Installer will be run.
The install program will then search, on your local PC, for an existing EDS installation to update.
Note that you cannot update a previous version, for example EDS 7.x.
If you have customized files in a previous version of EDS you should install the new version, then copy your customized files to the new version. However, the search for an existing EDS installation will find a previous installation. You should decline the offer to install into this directory.
If you do not have an existing EDS installation to update, a default installation directory will be suggested.
You will be displayed the Install program main window.
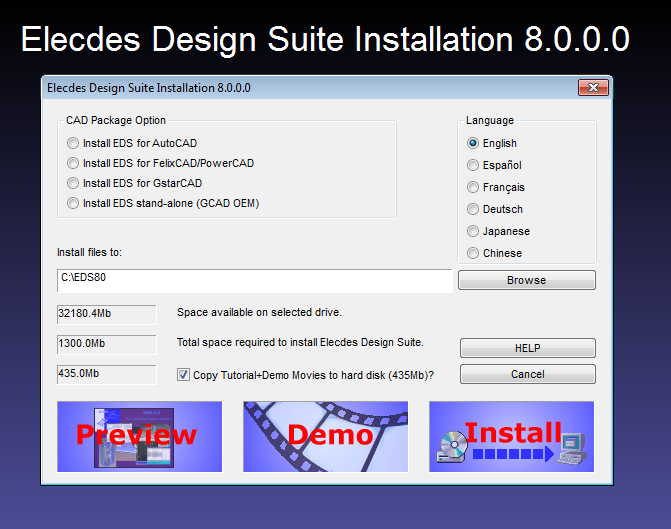
To view a preview presentation, click the Preview button.
To view a full demonstration of the software, click the Demo button.
Choose the language that you wish to use.
Choose the CAD package you wish to use with EDS.
If you are installing EDS as a stand-alone electrical package, without an existing CAD package, ensure that you choose the GCAD OEM option.
Enter the path where you want to install EDS into the Install files to text box, or use the browse button to select a location.
This will be your EDS Main directory.
If you wish to update an existing NETWORK installation, you may enter the directory containing the EL32.INI file of the network EDS installation you wish to update. See Networking.
The available and required disk space [for EDS installation] will be displayed.
You can check Copy Tutorial+Demo Movies to hard disk to have the tutorials and demonstration movies copied onto your hard drive. These demonstration movies are large and do not need to be installed to hard drive. They can be run from the installed EDS program icons when the EDS DVD is in the DVD drive from which you are installing EDS. If you are using the downloaded installer, and untick this option, the demo movies will be unavailable.
Press the INSTALL button to continue.
If you have chosen to direct the install program to place files into an existing installation, you will be asked how to proceed with that installation. See the section below dealing with Existing Installations.
Install will then analyse your system for prerequisite software, and prompt you to install redistributable packages for software it could not find (including GstarCAD if you selected GCAD OEM on the previous screen).
If no redistributables are required, this dialog will be skipped.
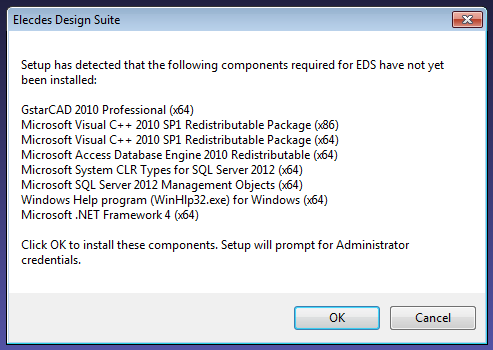
Note: The number and order of redistributables shown will vary depending on your operating system and current system state. The above is an example only.
Click OK to install the required redistributables. You will be prompted for administrator credentials:
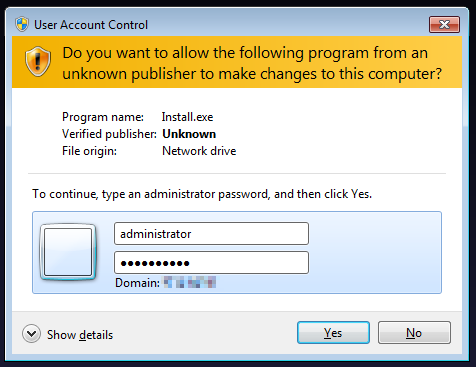
Redistributable installation will then begin.
Note: None of the redistributable packages (apart from GstarCAD) require user interaction.
Note: Redistributable packages can be found on the installation media in the Redist folder, should you require them (eg: for reinstalling them or deployment by an administrator).
Click OK to begin copying EDS files.
The EDS directories and sub-directories are created with all associated files copied into them. Please read the File and Directory Tour at the end of this manual.
In some cases, Install may now prompt for a reboot. After rebooting, ensure to log in as the same user and then installation will finish and run Setup.
If a reboot is not required, Install will run Setup immediately.
Existing Installations
If you have chosen to direct the install program to place files into an existing installation, you will see the following dialog asking how to proceed with that installation:

If you specifically choose a different CAD package from the CAD package for which EDS was previously installed, you will only have the option to Delete and Re-Install.
If you specifically choose an existing installation for an older version of EDS, you will only have the option to Delete and Re-Install.
Overinstall
-
If you choose to Overinstall, new files will be copied into your existing installation. Use this option to repair a damaged installation of EDS.
-
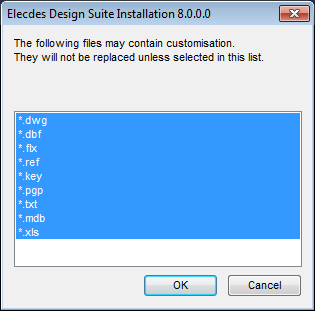
Not all files are copied when over installing. The install program attempts to keep all of the files that you may have customised. You will be presented with a list of file types that you may have customised. Please choose any of these file types that you require to be overwritten. Any files that are not in this list will automatically be overwritten, for example the program files: *.exe, *.dll and *.arx.
-
The installer will merge any DBF files that have been customised with the newer versions being installed. See Updating Existing DBF Files.
Network Install
-
Choose Network Install when you are connecting a workstation to a remote installation of EDS that will be shared by multiple workstations. No files will be copied. Install proceeds to the next stage: installing Redistributables.
Delete and Re-Install
-
If you choose Delete and Re-Install, the existing installation of EDS will be completely removed and a new installation will be created in a new directory with the same name as the previous installation. Use this option with caution, as you may lose any customised files stored in your previous EDS installation.