How to Link Components in the Database
Linking Components
Linking components refers to creating a relational link in the database between two components. These links are used to indicate the following relationships:
-
A component is contained within another component.
-
A component is electrically connected to another component.
-
A component is associated with another component
-
A component should be shown on an output diagram.
-
A specific template is used to produce an output diagram.
There are two main ways to create links between components, drag and drop and by using the commands on the pop-up menu.
Electrical Connections
Electrical connections are stored in the project database in the same way as other component links such as containment. Electrical connections are also created in a similar way; by either drag-and-drop or from the "Connect To " item on pop-up menu for a component.
Drag And Drop
Components in the tree and list can be dragged in the Instrument Manager window, this is used to make links to components. When using drag and drop to link a component, the cursor shows whether or not it can be dropped (linked) on the component it is currently being dragged over.
 This cursor appears if the component can be dropped (linked).
 This cursor appears if the component cannot be dropped.
The cursor type is determined by the linking rules specific to the item being dragged. These are outlined in the section on components.
-
Select one component from the tree, or select multiple components from the list in list view that you wish to be contained within another component.
-
Click the left mouse button over the selected component or components.
-
Without releasing the left mouse button, drag the mouse pointer to the entry for the container component in the tree, then release the button.
Branches of the tree will automatically expand when you move the mouse pointer over them while dragging a selection. The tree will automatically scroll up or down if you move the mouse pointer to the top or bottom of the tree.
-
This will set the containment or parent link for each chosen component. The contained components will then be shown as links under the container component in the tree.
"Add Existing" from the menu
Many components in the project database can have child components contained in them (i.e. become their parent).
-
Right click on the component that is to become a container.

-
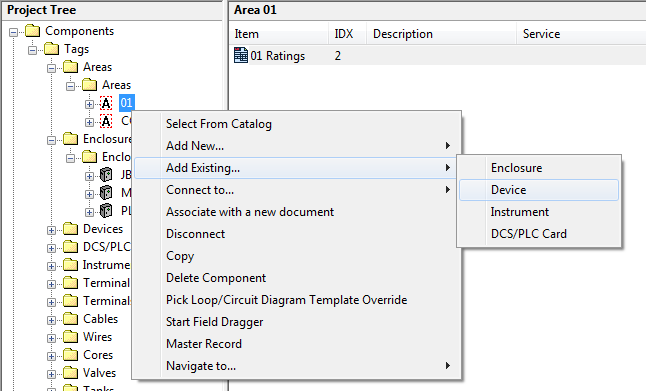
Select "Add Existing..." from the pop-up menu, then select the type of child component to be contained.
-
This will display a list of available components of the selected type. They are considered available if they are not already contained in another component.
-
Select one or more components from the list and click the [OK] button.
-
This will set the containment or parent link for each chosen component. The contained components will then be shown as links under the container component in the tree.
"Copy" and "Paste Link" from the menu
A component can be placed into a container component by copying the component, then pasting a link to the component under the intended container component.
-
Select one component from the tree, or select multiple components from the list in list view that you wish to be contained within another component.
-
Right click with the mouse pointer over the selected component or components.
-
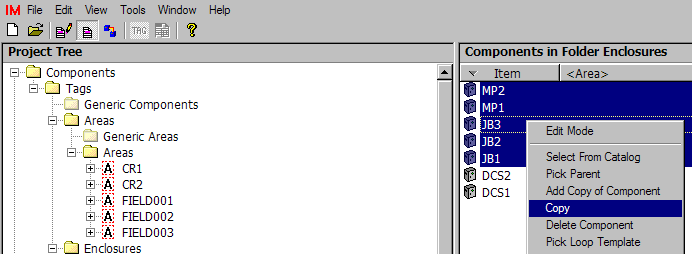
Select "Copy" from the pop-up menu.
-
Right click on the component that is to become the container.
-
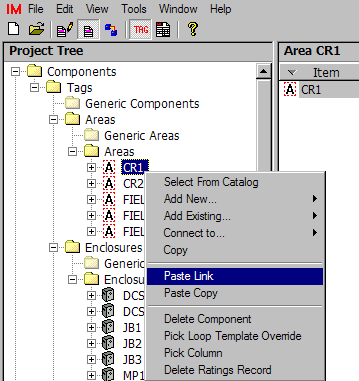
Select "Paste Link" from the pop-up menu.
-
This will set the containment or parent link for each chosen component. The contained components will then be shown as links under the container component in the tree.
Paste Link Sequential
Sequential pasting allows fast assignment of a group of components to another group of components.
For example we can link five enclosures to five areas.
First copy the five enclosures into the clipboard.

Next choose the area where you want the first enclosure to be linked.

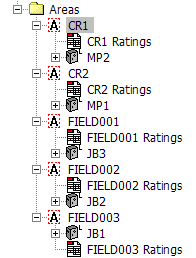
Choose paste link and choose the paste sequentially option. The five enclosures will be linked sequentially to the five areas as shown below.

This can save you a lot of time and effort.
Pressing Ctrl-V will also perform this operation.
"Copy" and "Paste Association" from the menu
Associations can be made between user defined types and built in types as well as to other user defined types.
You can associate a device or instrument with a PLC I/O card channel (a terminal group). This association is recommended for fetching information about the I/O channel for use on loop diagrams or datasheets.
Associations can be made between any of the "main" component types: instruments, devices, terminal strips and I/O cards.
A component can be associated with another component by copying the component, then pasting an association.
-
Select one component from the tree, or select multiple components from the list in list view that you wish to be associated with another component.
-
Right click with the mouse pointer over the selected component or components.
-
Select "Copy" from the pop-up menu.
-
Right click on the component that is to become the container.
-
Select "Paste Association" from the pop-up menu.
-
If you have chosen to associate two main component types (which are therefore of equal hierarchy), then you will be asked to pick which component will be associated with the other component.

The top two buttons will choose an association direction for just this link and the bottom two buttons will set the default association direction, so this question will not appear for future links.
-
This will set the association link for each chosen component. The associated components will then be shown as links under the component in the tree.
"Associate ... with ..." from the menu
You can also set the association links using the "Associate this <type name> with other components..." OR "Associate other components with this <type name>..." context menu:
-
Select one component from the tree, or select multiple components from the list view that you wish to associate other components with, or associate with other components.
-
Right click on the selected component or components.
-
Select the appropriate option from the pop-up menu based on the direction of the association that you want to make.
-
The "Associate Components" dialog will appear with a list of components that the selected component or components can be associated with / associated to.
-
Select one or more components from the list that you want to associate and press .
-
This will set the association link for each chosen component. The associated components will then be shown as links under the components in the tree.


"Pick Parent" from the menu
You can choose a component to contain the currently selected component or components.
-
Select one component from the tree, or select multiple components from the list in list view that you wish to be contained within another component.
-
Right click with the mouse pointer over the selected component or components.
-
Select "Pick Parent" from the pop-up menu.
-
This will display a list of suitable container components.
-
Select one of the components from the list and click the [OK] button.
-
This will set the containment or parent link for each chosen component. The contained components will then be shown as links under the container component in the tree.
Assigning Components to Output Diagrams
One or more components can be assigned to an output diagram using any of the following procedures, which are described above:
-
Drag and Drop components onto an output diagram entry in the tree.
-
"Add existing" component from the pop-up menu for the output diagram item.
-
"Copy" components and "Paste Link" onto the output diagram.
For assigning a component to a custom loop diagram, there is an additional step of choosing the link to which the component is to be assigned.
Assign components to output diagrams
