Paperspace and Modelspace
Introduction
Paperspace and Modelspace permit multiple views of your model and plotting of multiple views on one sheet. In order to understand Paperspace and Modelspace, it is useful to look at the history and development of AutoCAD and the terms being used.
History
In AutoCAD Release 9 and before, we worked with only a single view of our model on screen.
In Release 10, Autodesk introduced the original VPORTS command which produced fixed rectangular viewports to fill the drawing area. These viewports could not overlap each other and in this sense they appeared like `tiles' on screen. Autodesk called this multi viewport screen use "tile mode". Each viewport could display the model at a different zoom scale or from a different viewpoint. (Viewpoints set the viewing direction from 3D space).
Only one viewport could be plotted at a time in tile mode.
In Release 11 Autodesk introduced Paperspace to allow the plotting of multiple viewports.
To retain compatibility with Release 10, they created the variable TILEMODE. The tilemode variable is used to switch between a Release 10 tile mode screen layout and the new PAPERSPACE layout.
The Paperspace system introduced a new type of freeform viewport, which was not compatible with tile mode. It was called MODELVIEWS. MODELVIEWS are identical to viewports except they can overlap, are easily resized and do not have to fill the entire screen.
PAPERSPACE is like a master viewport, which must take up the whole screen and represents your sheet of paper. Paperspace can contain your drawing border and any border annotation as well as any number of viewports [freeform, overlapping modelviews].
Model views can only display construction done in MODELSPACE. Modelspace is the original Release 10 drawing area. Any construction you do inside a model view is placed in modelspace.
Since Release 11 you can set the TILEMODE switch to ON and work in a tiled Release 10 mode or set TILEMODE to OFF and use a paperspace mode of display with modelviews arranged on it.
In the latest versions of AutoCAD, Autodesk have simplified the TILEMODE system. There are multiple layout views instead of TILEMODE. The Model layout is TILEMODE ON and all other layouts are TILEMODE OFF.
Paneldes
Paneldes uses the Paperspace system, which is by far a superior 3D environment to tile mode.
The drawing below illustrates how Paneldes uses the AutoCAD Modelspace / Paperspace system.
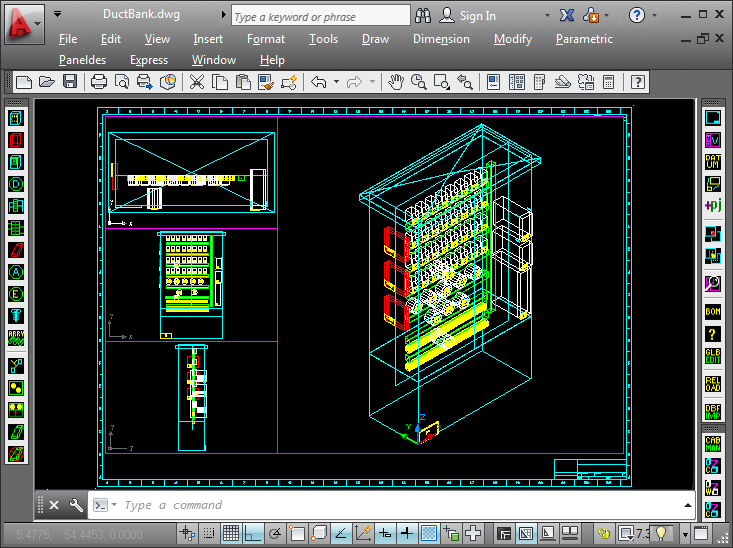
In the above diagram we have placed the border, titleblock and annotation in paperspace. Inside paperspace we have created 4 model views. The model views appear as rectangles and contain windows into our construction. Our model is a kiosk panel mounting plate and some devices, terminals, accessories and ducting fitted. The panel has been constructed in modelspace.
Paneldes will automatically switch your drawing session to MODELSPACE prior to execution of most functions, which need to be run in MODELSPACE. E.g. Construction, Global Editing , BOM etc.
Commands to Know:
| TILEMODE=1 (ON) | Use a tiled set of viewports to edit your model in modelspace. |
| TILEMODE=0 ( OFF) | Enters paperspace, prompts you to create modelviews or insert and edit your border . |
| MVIEW / VPORTS | AutoCAD command for manually creating modelviews / tiled viewports. |
| PSPACE / MSPACE | With TILEMODE=OFF switch between Border editing / Model editing |
Tips
-
The Paneldes menu has the entries "Floating Model Space" and "Paper Space" for your convenience.
-
AutoCAD now provides a MODEL/PAPER space button on the status bar. Double click on this button to switch.
-
If working in modelspace, the current modelview border is highlighted and you can transparently pick in another modelview to make it current during most AutoCAD and Paneldes operations [exceptions; when executing viewing commands e.g. "zoom"].
-
You can create as many model views as you wish. You can construct and edit your model in any model view.
-
Each model view can have layers specifically frozen or thawed. This is achieved by; making the model view current, then picking the layer settings dialogue box, selecting the layer(s) and using the current viewport settings.
-
Each model view can have separate snap and zoom settings.
-
When in Paperspace, the model view frames are like any other entities and can be moved, copied, stretched or scaled with the normal AutoCAD commands.
-
You can full screen view (and work on) any model view e.g. Switch to paperspace and zoom in on the desired model view, then switch back to modelspace.
Paneldes Border and Model views
When you start a Paneldes drawing session OR start a new drawing with Paneldes, you will be placed in the paperspace environment and there will be no active modelviews. You must insert a border and create some modelviews. The following topics describe this:
Border insertion in Paperspace.
Notes
You MUST create your 3D models in MODELVIEWS or VIEWPORTS. I.e. The model must be created in MODELSPACE. AutoCAD does NOT supply a full set of 3D commands in the PAPERSPACE area.