How to Manage Large Numbers of Components
General
Once the Instrument Manager database contains a large number of components, the list views and tree categories can become very long. You may also be unsure which subfolder contains a particular component or you may wish to jump quickly to the container or diagram for a component.
Instrument Manager provides a number of tools and techniques for finding components within the Instrument Manager interface and for reducing the number of components that you see in any one list.
-
You can apply a temporary filter to the list and edit views to reduce the number of components.
-
You can sub-divide the component folders to divide the lists of components into manageable quantities.
-
You can "navigate" from a link for a component or from a list entry for a component to its main or master entry in the category tree.
Filtering the List and Edit Views
The list and edit views can be quickly filtered allowing you to reduce the volume of components in the list to a manageable quantity. Filters are retained in the main lists until you choose to clear them. When you return to a list the previous filter will still be applied.
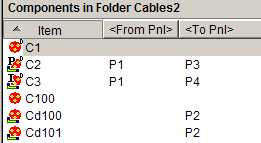
For example you may wish to work with some cables, however there are 5000 cables in your list. You are however only interested in cables connected to enclosure P1. You can filter the column <From PNL> to show only cables containing a connection to "P1", limiting the list to contain only the 30 cables connecting to enclosure P1.
Filtering the list of the Tags folder is a particularly good method to find a component by name.
-
List view: Click on the RIGHT SIDE of the column header bar at the top of the column of interest.
Edit view: Double click the column header bar at the top of the column of interest.
-
An edit box will open under your mouse and you can enter the filter you wish to apply to the column.
Filters can include multiple values, as well as comparisons and wildcards. See Specmatch for information on defining valid filters.
Note: If you enter a filter without any comparison operators, and without wildcards, then the filter is assumed to mean all values beginning with the filter value. For example, a filter of P1 is interpreted as P1*.
-
You can use one of the wildcards: ' * ' for any characters, ' # ' for any digits or ' @ ' for any letters in the filter text that you enter. For example the filter "P1#" will match P1, P10 or P123 but not P1A.
-
You can enter a comparison prefix in the filter ' = ', ' < ', ' <= ', ' > ', ' >= ', ' <> ', and ' != ' (not equal).
If you use a comparison prefix then the filter is used verbatim, not treated as ending in a wildcard. For example, if you want to find an exact match you can enter "=P1" and this will match only the value "P1".
If you use a comparison prefix then any wildcard that you enter on the end of the filter will be ignored.
-
Press enter to confirm your filter and return to the list/editing session.
-
To remove all filters from a column, open the edit box then press <SPACEBAR> or <DEL> then <ENTER>.
Alternatively, right click on the column heading(s) and choose Clear filter (to clear the filter on the selected columns), or Clear all filters (to clear all filters from all columns).
The current filter string is displayed in the grey column header bar if a filter exists.

Sorting the List and Edit Views
List views can be quickly sorted by any column by clicking on the LEFT SIDE of the column header bar at the top of the column of interest. An "ascending" sort order will result based upon the data in that column. If you click on the LEFT SIDE of the column header a second time, then the view will be sorted in reverse, in a "descending" order.
Both list views and edit views can also be sorted by right clicking on the column header, and choosing or .
Subdivide / Split Folders
IM allows you to manage folders that contain large lists of components by subdividing the folder. Your component lists can be split into lists of a more manageable size.
Subdividing the folder creates a container which can contain the identical type of component as the original folder. You can subdivide a cables folder and within it create more cables however you cannot subdivide a cables folder to contain enclosures.
You can only subdivide folders that represent ratings tables in the database. These are the folders that exist underneath each of the component type folders. The most numerous of these are the different instrument folders.
-
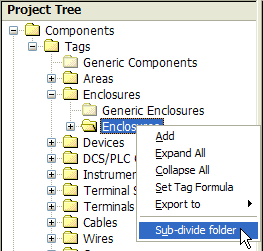
Right click on the folder that you wish to split and select "Sub-divide folder" from the pop-up menu.
-
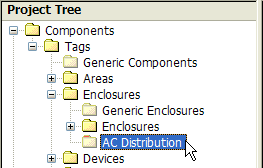
Enter the name you require for your new folder.
-
Click [Ok] and a new empty folder will be created in the tree. Subdivided folders have red colouration on the "tab" of the folder graphic.
-
You can create new components in the new folder.
-
You can drag existing components from the original folder and drop them in the new folder.
You can freely move components between folders that were split from the same original ratings folder but you cannot move components between folders that were split from different ratings folders.
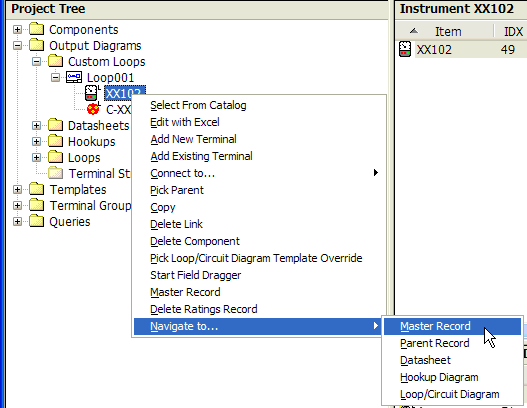
"Navigate To..." or "Master Record"
The navigation functions allow an easy way of moving from a link object in the tree or from an item in the list view to the actual (master) object. The master objects exist in the folder on the tree that represents the table in which the record for the component exists in the project database. Objects that are links (not master objects) are shown in the tree will a 'L' in the corner of their icon.
Navigating from a filtered list view shown for the Tags folder is a particularly good method to find a component by name.
-
Right click on the component from which you wish to navigate, either in the tree or in the list view.
-
Select "Navigate To..." from the pop-up menu, then select the type record to which you wish to navigate or, for some tree entries, select "Master Record".
The number of navigate functions that will be available in the submenu depends on the types of links that can exist for the component.
-
Navigate To Parent Record.
Set the current selection in the tree to the component that contains the currently selected component.
-
Navigate To Master Record or Master Record.
Set the current selection in the tree to the master object for the currently selected link object in the tree.
-
Navigate to Diagram.
Set the current selection in the tree to the chosen diagram on which the currently selected component is shown.
-
Navigate to Template.
Set the current selection in the tree to the template for the currently selected output diagram.
-
Navigate to Drawing Representation.
If the component is present on any of the drawings in the project, you can select this option to navigate to the component in the drawing. The Cross Reference Query Dialog will appear with a list of all of the references of the component from all of the drawings in the Project. Select a reference from the list that you want to navigate to and press the button. For more information, see Cross Reference Query Dialog.
Tags Folder
When a Tag folder itself is selected in the tree it displays in the component list all of the components contained in the tag table that the folder represents. This is useful if you wish to find, for example, a particular instrument but you do not know which instrument subfolder it has been placed in. In the Tags folder all of the instruments will be displayed in the list.
-
You can filter or sort the list for the Tags folder to find a particular component.
-
You can navigate from the list for the Tags folder to the master entry for that component in the tree.
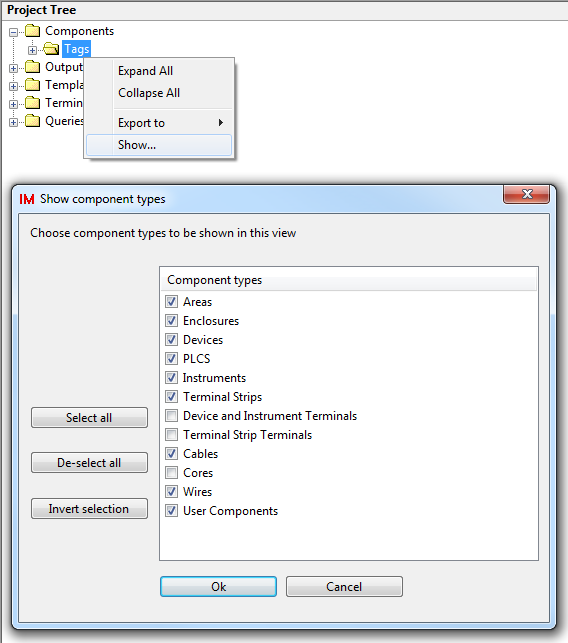
The Tags folder provides another filter for the list view. You can choose which types of components will be included to limit the number of components shown in the list for a tag folder.
-
This can be done by right clicking on the Tag folder and selecting "Show...".
-
This displays a tick list of components that will be displayed, from which items can be activated or deactivated. By default all terminals and cable-cores are omitted from the list.