How to Configure Database Reports
The pages of the report wizard are a step by step guide through the process of configuring a database report. At any point in the wizard the [Back] button can be used to return to the previous page to alter the configuration. The [Cancel] button will exit the wizard without performing any report generation. The purpose of each page in the report wizard is outlined below.
Procedure
-
Select "Configure Database Report" from the Instrument Manager File menu.
The report wizard will start with the following page:
Load previous report settings
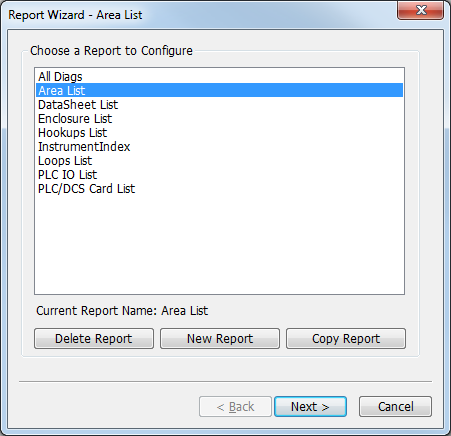
The first step in the report wizard allows you to load the configuration of an existing database report, delete an existing report or copy an existing report.
-
To delete an existing report select it in the list and click the [Delete Report] button.
-
To create a brand new report click the [New Report] button.
The Generate Database Reports function will create a single table containing the data for the report in a report database that is chosen in the next step. The name of table will be the same as the name that you give to the report in this step.
-
To copy an existing report select it in the list and click the [Copy Report] button.
-
-
To load a report select it in the list and click the [Next] button.
Report output parameters
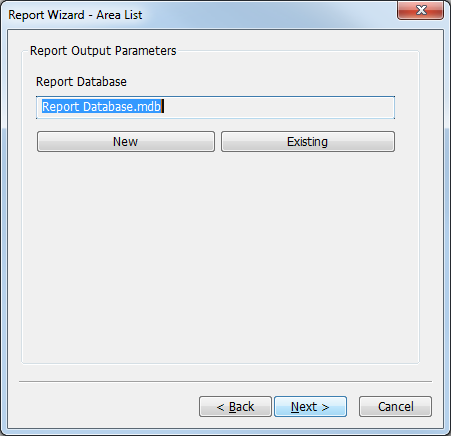
Select the destination database file for the report.
-
Enter the name of the database file that will contain the report. The file can either be an existing or a new file. Click the [Existing] button to choose from a list of existing database file or to choose a specific directory in which to create the database file.
-
If the report database is new, it will be created as a copy of the selected report template. The templates in the list are the files in the <EDS>\IMP_IM\ReportTemplates directory for imperial users or the <EDS>\MET_IM\ReportTemplates directory for metric users. The appropriate template should be selected according to the version of Access which is installed so the report can be viewed later.
Custom report templates can be added to the directory and used as a basis for generating report databases.
-
Click the [Next] button to continue.
Base Table and Column selection
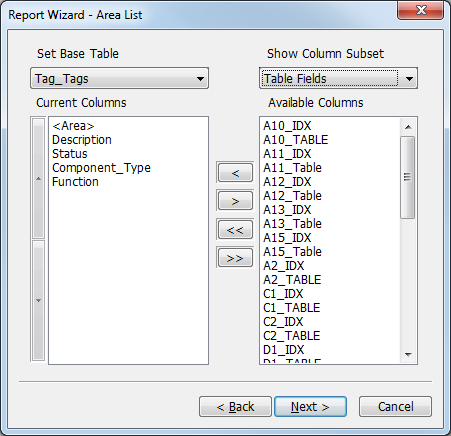
Select the base table for the report. The report will be able to fetch data from other tables that are related to the base table, but in this box select the table that is the base container of the items that are to be reported.
-
From the drop-down list in the top left, select the table or table type from which the report will be generated.
There are two collective entries at the top, namely "All tags tables" and "All o/p (output) diagram tables".
The remaining entries are specific table names, e.g. Cable_Cables, Tag_Tags, "TStripDiag_Terminal Strip Diagrams".
-
The columns to appear in the report are shown in the left list. The columns that are available to place in the report are shown in the right list.
-
To add a column to the report, select the column in the right list and click the [<] button.
-
To remove a column from the report, select the column in the left list and click the [>] button.
-
The order in which columns will appear in the report is the same as the order they appear in the left list. Select one or more columns in the left list and click the up or down button located on the left of the page to move the selection up and down respectively.
-
The available columns, displayed in the right list, can be selected from a variety of sources, which can be selected from the drop-down list positioned above it. The drop down list contains up to three categories: Table Fields, Relational Aliases and Rating Data Fields.
The Table Fields category contains the columns from the base table.
The Relational Aliases category contains all of the aliases that have been created in your database. These aliases are used to fetch data from other records that are related to the base table.
The Rating Data Fields category appears only when the base table is either Tag_Tags or "All tags tables". The rating data fields category contains all of the columns from all of the rating data tables in one unified list.
-
-
Click the [Next] button to continue.
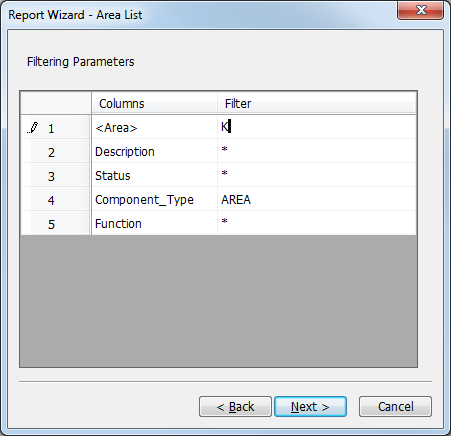
Filtering parameters
-
Enter filters to specify which records from the project database are written to the report. Records will only be written to the report if their data matches all of the specified filters.
Any column filter set to "*" will match any and all data in that column of each record.
For example, the filters in the example above will write into the report only components that have a Component_Type of "Area" and that have Tagnames beginning with "K".
See Specmatch for information on defining valid filters.
-
Click the [Next] button to continue.
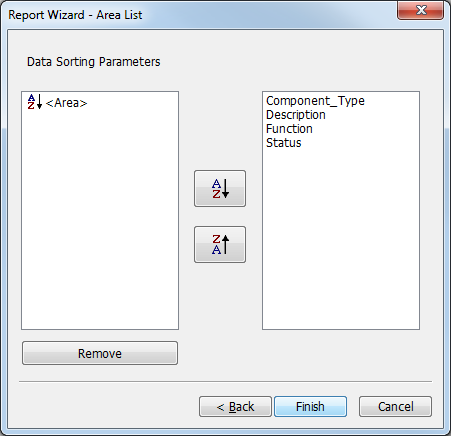
Data sorting parameters
-
The records of the report will be sorted by the columns that are shown in the left list. The records can be sorted by more than one column. The primary sort order is defined by the first column listed in the left list. If the data in that column for two records is equal, then the records will be sorted by the next column and so on.
The columns that are available to sort the report are shown in the right list.
-
To sort the records of the report by a column, select the column in the right list and click either the [A-Z] or [Z-A] button.
Columns ordered [A-Z] will sort data in increasing alphanumeric order: "FT800" comes before "PT100".
Columns ordered [Z-A] will sort data in decreasing alphanumeric order: "PT44" comes before "FT44".
-
To change the sort order for a column, select the column in the left list and click either the [A-Z] or [Z-A] button.
-
To stop a column from determining the sort order, select the column in the left list and click the [Remove] button.
In the example, the result of the sorting will be such that the items in the report will appear alphabetically from top to bottom in groups according to their area name, and ordered within each area alphabetically by their tagname.
-
-
Click the [Finish] button to generate the report.
You can edit the report field order and formatting inside MS Access. This formatting including the field order will be retained next time you generate the report from Instrument Manager.