Importing Existing Project Databases
Instrument Manager can import all content from an existing Instrument Manager or Cable Scheduler database, into the current database.
This includes:
- Component tags, their ratings, and terminal groups
- Raceway segments and groups
- Output diagrams/datasheets, and their templates
- Folders and their settings
- Aliases
Project database importing can also operate in template mode, which allows a project database that has been prepared with placeholders to be imported multiple times, with the user providing the desired placeholder values for each copy prior to importing.
Standard Import Procedure
Use the standard import procedure when you want to import an existing sub-project (hereafter referred to as the source project/database) into a combined project (hereafter referred to as the destination project/database).
Ensure that the source project is not in use (otherwise the import may not be consistent).
From the menu, select .
In the dialog, navigate to and select the .prj file of the source project.
-
Verify the project and database shown in the group box are as expected.
Verify that the is set to . If not, your chosen source project may have been automatically detected as a template database due to the presence of formulae - if this is not intentional, switch the mode back to , otherwise follow the steps for a templated import.
Enable Backup current project database if desired. Backup is recommended if the destination database already contains data/components.
-
Click to start the import process.
If enabled, the destination database first will be backed up as a MS Access database file in the destination project directory.
Instrument Manager will then analyze the source and destination databases, and begin to import entities from the source database into the destination database.
If was set to , and Instrument Manager encounters an entity in the source database that matches one or more entities in the destination database by name, but none of those entities have matching properties/data, then you will be shown the dialog, and asked for an action to take.
Templated Import Procedure
Use the templated import procedure when you want to create multiple copies of the content of a template project in the current project (hereafter referred to as the destination project/database), where each copy only differs by textual data in the records of its entities (such as tag names).
-
Set up a template project and database if you haven't already done so.
Create a new Instrument Manager project to be the template project.
Populate the template project with desired components, diagrams, templates etc.
-
Edit records in the database, inserting standard EDS formulae wherever you need data to vary for each insertion of the template (commonly this will be the Tag names of components and diagrams etc).
When you import the template in the subsequent steps, you will be prompted to enter a value for each unique source data expression, for each copy of the template. It is thus best to minimize the number of unique source data expressions used, by reusing the same source data expressions where possible, including using formulae functions to derive different values from a single input (for example, deriving an incrementing sequence of loop numbers from a starting loop number provided via source data expression).
Close your template project when done.
From the menu, select .
In the dialog, navigate to and select the .prj file of the template project.
-
Verify the project and database shown in the group box are as expected.
Verify that the is set to . If not, your chosen template project was not automatically detected as a template database due to the lack of formulae in the [Tag_Tags].[Tagname] column - if your template has formulae in other columns, switch the mode back to , otherwise, cancel the import, and reassess the preparation that was required for the template project as described in step 1 of this procedure.
Set the number of of the template that you want to import/insert.
Enable Backup current project database if desired. Backup is recommended if the destination database already contains data/components.
-
Click to start the import process.
-
Instrument Manager will first analyze the template database for formulae, compile the set of unique source data expressions used by all the formulae, then present an editor allowing you to enter a value for each source data expression, for each copy (instance) of the template.
You can enter the same or different values for each instance of source data expression, depending on how your source data expressions are used, and what result should be produced.
If enabled, the destination database will then be backed up as a MS Access database file in the destination project directory.
For each copy (instance) of the template required, Instrument Manager will "instance" the template in memory (evaluating any formulae found, using the provided values for the source data expressions for that instance), analyze the instanced template and destination databases, and begin to import entities from the instanced template database into the destination database.
If was set to , and Instrument Manager encounters an entity in the source database that matches one or more entities in the destination database by name, but none of those entities have matching properties/data, then you will be shown the dialog, and asked for an action to take.
-
Project Import Options Dialog
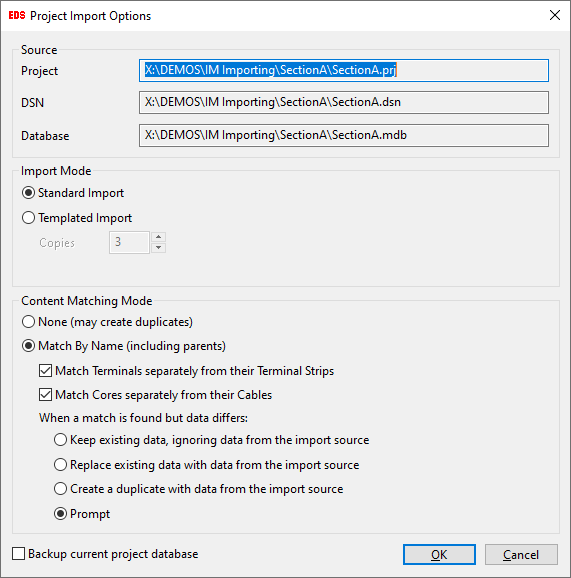
Import Mode
Used to switch between standard and templated import modes. Instrument Manager will pre-set this option based on whether or not it found any formulae in the [Tag_Tags].[Tagname] column of the source database.
When in templated mode, specifies how many copies of the template should be imported. When starting the import, you will be asked to provide values for each source data expression, for each copy requested.
Content Match Mode
Controls whether Instrument Manager should look for entities in the destination database that match the entities being imported from the source/template database, and if found, what action should be taken.
No attempt will be made to match imported entities against entities already in the destination database. Destination database entities will be left unchanged, and the source/template database entities will be copied into the destination database. Depending on the content of each database, the destination database may end up with multiple components with the same name, which may produce errors in EDS reports etc if not subsequently addressed.
-
Entities being imported will attempt to be matched by name against entities already in the destination database. Name matching algorithms vary by entity type, but are consistent with EDS unique-name requirements (for example, Terminal components must have at least a matching name, parent/device name, and grandparent/panel name, in order to be considered a match).
Match Terminals separately from their Terminal Strips: When enabled, treats any Terminal children of Terminal Strips as components that can be independently imported, meaning that any such terminals in the source/template database will be individually checked for in the destination database and compared/imported one-by-one, effectively unioning the set of Terminals from a particular strip in the source/template database with the set of Terminals from the same strip in the destination database. When disabled, treats the Terminal children of Terminal Strips as properties of the strip (as is the case with Device terminals), meaning that the destination database will end up with either its original strip and all the original terminals, or the imported strip and all its original terminals, or both.
Match Cores separately from their Cables: Conceptually similar to the above. Off by default as most cables have a fixed set of cores.
: Whenever one or more entities are found in the destination database that match an entity in the source/template database, Instrument Manager will check to see if there are any discrepancies in the entity properties/data. If any match has no discrepancies, Instrument Manager infers that the source entity is that matching destination entity, will automatically proceed. Otherwise, a decision needs to be made on how the discrepancies are to be resolved.
If there was only one matching entity in the destination database, it will be retained as-is - no properties/data from the entity from the source/template database will be imported. If there were multiple matching entities, Prompt.
If there was only one matching entity in the destination database, it will have its properties/data replaced with the properties/data of the entity in the source/template database. If there were multiple matching entities, Prompt.
Any matching entities in the destination database will be retained as-is, and the entity from the source/template database will be copied as-is into the destination database, creating a duplicate (by name) entity.
-
Shows the Resolve Match dialog, which will show the matching entity or entities in the destination database, highlight the differences between the destination and source/template entities, and allow you to make a choice of one of the above three options for that entity (or cancel).
Use this option while testing a project import, or developing a template project, to help identify any unexpected issues.
Resolve Match Dialog
The Resolve Match dialog will be shown if Content Match Mode is set to , and Instrument Manager finds one or more entities in the destination database that match an entity in the source/template database by name, but none of those entities have matching properties/data.
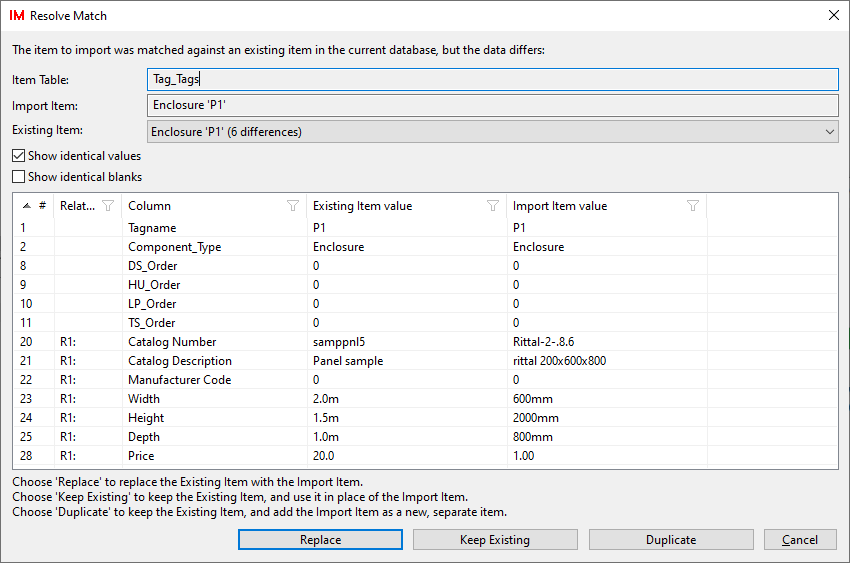
Specifies the main table of the entity being imported.
Specifies the type and name of the entity being imported.
Shows the types and names of matching entities found in the destination database, and how many differences each had compared to the entity being imported. The destination entity with the fewest differences is automatically selected.
Show identical values When enabled, causes the comparison list below to show entries for populated data/properties that are identical between the selected matched entity, and the entity being imported. This is useful for seeing more context about the selected matched entity and the entity being imported, which can help determine the best action to take.
Show identical blanks When enabled, causes the comparison list below to show entries for data/properties that are blank in both the selected matched entity, and the entity being imported.
-
The comparison list shows a side-by-side comparison of the properties/data of the selected matched entity and the properties/data of the entity being imported, with one property per line.
Entity properties include any "owned" child entities, records, and links (like component rating records, a device's terminals, and a conductors connection targets).
Use the drop-down list in conjunction with the comparison list to review the matched entities from the destination database, select the appropriate matched entity (if there is more than one), and then choose which action to take with regard to the entity being imported, using the action descriptions and buttons at the bottom of the dialog.