How to Create a New Cable Scheduler Project and Database
Projects created by Cable Scheduler are the same as the EDS projects used by Elecdes. Each project can contain only one Cable Scheduler database. This will be referred to as the "project database". The Cable Scheduler specific data is stored in this project database, which can be either a Microsoft Access database or SQL Server database.
Since the project database is the central storage of all of the data, it is possible to share or copy an entire Cable Scheduler project by sharing or copying the database file.
ODBC Data Source: ".DSN" File
An "ODBC Data Source" is used to connect to the project database. For Cable Scheduler this is a file with the extension ".DSN", usually called a "File DSN". This data source file will have the same name as the project database to which it is supposed to connect.
The "DSN" file for a project database is listed in the Ebase project along with any drawings that are also part of the project. This entry retains Cable Scheduler's link to the project database.
Cable Scheduler creates the data source file when you first open or create a project by copying a template DSN file from the folder "<EDS>\ODBC\Data sources".
Creating a New Microsoft Access Project
This procedure is used to create a new Cable Scheduler Project with a project database in Microsoft Access format.
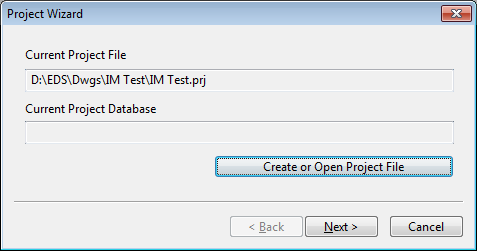
From the "File" menu, select "Create/Open Project". The Project Wizard window will be displayed:
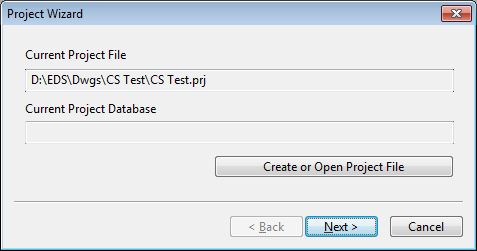
Click the [Create or Open Project File] button to specify the project file.
Select an existing EDS project that has no Cable Scheduler database associated with it, or enter the name of a new EDS project to create.
Click the [Next] button. This will display the database configuration page:
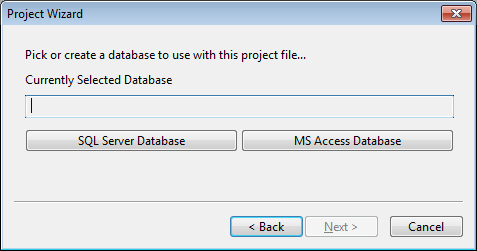
Click the [MS Access Database] button to configure the project to use an Access database.
-
If the database to use already exists, choose it from the list; otherwise enter the name of a new database to create.
When creating a new database, a template needs to be specified. EDS ships with one default template (for Access 2000 and higher):
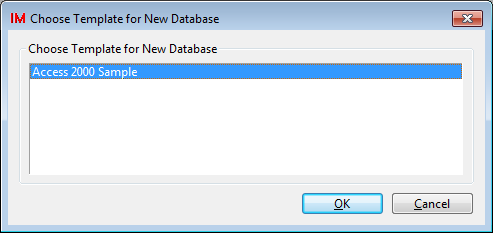
You may create your own project database templates. See Database Template in the Cable Scheduler customisation guide for more information.
Click the [Finish] button.
You will now be asked if you wish to enable username and password access to the new project. See the First Run section below for details.
Creating a New SQL Server Project
This procedure is used to create a new Cable Scheduler Project with a project database on an SQL Server.
From the "File" menu, select "Create/Open Project". The Project Wizard window will be displayed.
Click the [Create or Open Project File] button to specify the project file.
Select an existing EDS project that has no Cable Scheduler database associated with it, or enter the name of a new EDS project to create.
Click the [Next] button. This will display the database configuration page:
Click the [SQL Server Database] button to configure the project to use an SQL server database.

-
Click the [Search For Servers] button to load a list of available servers (this may take considerable time). Alternatively enter the server name in the box.
An entry for SQL Server Express will be forcibly added to the list regardless of whether you have SQL Server Express installed. This is done because SQL Server Express is not found by the search function. If you do not have SQL Express installed then connecting to that server entry will fail.
-
Click the [Connect] button and the databases on the chosen server will be displayed in the list.
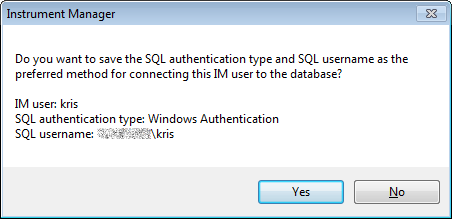
Cable Scheduler first tries to connect to SQL Servers using Windows Authentication (also known as "Integrated Security"), using the windows credentials of the currently logged in user.
If Cable Scheduler cannot do this automatically (ie, the selected server does not allow Windows Authentication, or your Windows account doesn't have permission to access the server), you will be prompted to login using standard SQL Server Authentication (username and password).
If the database to use already exists, choose it from the list. Note: Only databases you have permission to connect to will be shown in the list.
Alternatively, you can copy an existing database, or create a new database:
Copying an existing database:
Select the database you wish to copy from the list of databases, then click Copy Database.
Enter the name for the copy of the database and click OK.
You will then be prompted to enter administrator credentials for the database server.
The database will then be copied - wait for the process to complete:
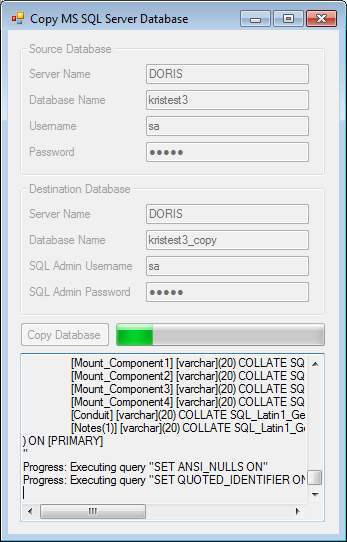
The copied database should then appear in the database list.
Create a new database:
Click New Database.
If your administrator has created a new empty database with the correct permissions then you should choose that database from the list, instead of clicking , then Instrument Manager will follow the remainder of this procedure except for the last step.
Enter the name for the new database and click OK.
When creating a new database, a template needs to be specified. EDS ships with one default template (for Access 2000 and higher):
You may create your own project database templates. See Database Template in the Cable Scheduler customisation guide for more information.
You will then be prompted to enter administrator credentials for the database server.
Cable Scheduler will then ask if the current user should be granted access to the new database. Click No if the database administrator will manually configure user access to the database, otherwise, click Yes.
The database will then be created - wait for the process to complete, then the copied database should appear selected in the database list.
Ensure the desired database is selected in the list and click the [OK] button.
Click the [Finish] button.
You will now be asked if you wish to enable username and password access to the new project. See the First Run section below for details.
First Run configuration
After creating the database, Cable Scheduler will ask you if you wish to enable username and password access to the new project:
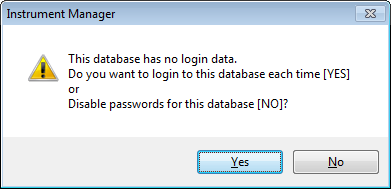
Clicking No will effectively allow read/write access by any user of Cable Scheduler who has access to the project and database. This option would be suitable for projects with only one user, or a small trusted team. No further user configuration is required.
Clicking Yes will allow additional access controls to be put in place as follows:
Set the project administrator password:
Add the current user to the project:
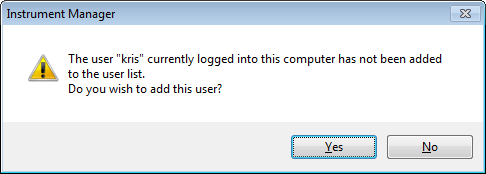
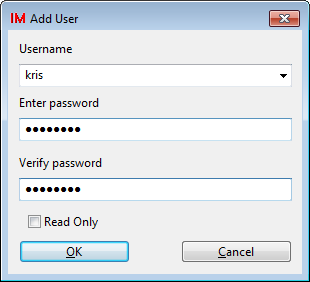
Clicking Yes will prompt to set a password for the current user:
You may be prompted during the previous steps to remember the SQL authentication type. If you choose No, you will still have the option of remembering the authentication type at a later point.